通知
📝 此頁面為 Laravel 官方文檔的繁體中文翻譯。查看原始英文版本
簡介
除了支援發送電子郵件外,Laravel 還支援透過各種傳遞通道發送通知,包括電子郵件、簡訊(透過 Vonage,前身為 Nexmo)和 Slack。此外,還建立了許多社群建立的通知通道,用於透過數十個不同的通道發送通知!通知也可以儲存在資料庫中,以便在您的 Web 介面中顯示。
通常,通知應為簡短的資訊訊息,用於通知使用者應用程式中發生的某些事件。例如,如果您正在編寫一個計費應用程式,您可能會透過電子郵件和簡訊通道向使用者發送「發票已付款」通知。
生成通知
在 Laravel 中,每個通知都由一個單獨的類別表示,該類別通常存儲在 app/Notifications 目錄中。如果您在應用程式中沒有看到此目錄,請不要擔心——當您運行 make:notification Artisan 命令時,它將為您建立:
php artisan make:notification InvoicePaid
此命令將在您的 app/Notifications 目錄中放置一個全新的通知類別。每個通知類別包含一個 via 方法和可變數量的訊息建立方法(例如 toMail 或 toDatabase),這些方法將通知轉換為針對特定通道量身定制的訊息。
發送通知
使用 Notifiable Trait
通知可以透過兩種方式發送:使用 Notifiable trait 的 notify 方法或使用 Notification外觀。Notifiable trait 預設包含在您應用程式的 App\Models\User 模型上:
<?php

namespace App\Models;

use Illuminate\Foundation\Auth\User as Authenticatable;
use Illuminate\Notifications\Notifiable;

class User extends Authenticatable
{
    use Notifiable;
}
此 trait 提供的 notify 方法期望接收一個通知實例:
use App\Notifications\InvoicePaid;

$user->notify(new InvoicePaid($invoice));
[!NOTE] 請記住,您可以在任何模型上使用
Notifiabletrait。您不僅限於將其包含在User模型上。
使用 Notification 外觀
或者,您可以透過 Notification外觀發送通知。當您需要向多個可通知實體(例如使用者集合)發送通知時,此方法很有用。要使用外觀發送通知,請將所有可通知實體和通知實例傳遞給 send 方法:
use Illuminate\Support\Facades\Notification;

Notification::send($users, new InvoicePaid($invoice));
您還可以使用 sendNow 方法立即發送通知。即使通知實現了 ShouldQueue 介面,此方法也會立即發送通知:
Notification::sendNow($developers, new DeploymentCompleted($deployment));
指定傳遞通道
每個通知類別都有一個 via 方法,用於確定通知將在哪些通道上傳遞。通知可以在 mail、database、broadcast、vonage 和 slack 通道上發送。
[!NOTE] 如果您想使用其他傳遞通道(如 Telegram 或 Pusher),請查看社群驅動的 Laravel Notification Channels 網站。
via 方法接收一個 $notifiable 實例,它將是發送通知的類別的實例。您可以使用 $notifiable 來判斷通知應在哪些通道上傳遞:
/**
 * 獲取通知的傳遞通道。
 *
 * @return array
 */
public function via(object $notifiable): array
{
    return $notifiable->prefers_sms ? ['vonage'] : ['mail', 'database'];
}
通知佇列
[!WARNING] 在將通知放入佇列之前,您應該配置您的佇列並啟動一個工作者。
發送通知可能需要時間,特別是當通道需要進行外部 API 呼叫來傳遞通知時。為了加快應用程式的回應時間,您可以透過向類別添加 ShouldQueue 介面和 Queueable trait 來使通知被放入佇列。對於使用 make:notification 命令生成的所有通知,該介面和 trait 已經被導入,因此您可以立即將它們添加到您的通知類別:
<?php

namespace App\Notifications;

use Illuminate\Bus\Queueable;
use Illuminate\Contracts\Queue\ShouldQueue;
use Illuminate\Notifications\Notification;

class InvoicePaid extends Notification implements ShouldQueue
{
    use Queueable;

    // ...
}
將 ShouldQueue 介面添加到通知後,您可以像平常一樣發送通知。Laravel 將檢測類別上的 ShouldQueue 介面,並自動將通知的傳遞放入佇列:
$user->notify(new InvoicePaid($invoice));
將通知放入佇列時,將為每個收件者和通道組合建立一個佇列作業。例如,如果您的通知有三個收件者和兩個通道,將有六個作業被派發到佇列。
延遲通知
如果您希望延遲通知的傳遞,可以在通知實例化上鏈式呼叫 delay 方法:
$delay = now()->plus(minutes: 10);

$user->notify((new InvoicePaid($invoice))->delay($delay));
您可以向 delay 方法傳遞一個陣列來指定特定通道的延遲時間:
$user->notify((new InvoicePaid($invoice))->delay([
    'mail' => now()->plus(minutes: 5),
    'sms' => now()->plus(minutes: 10),
]));
或者,您可以在通知類別本身上定義一個 withDelay 方法。withDelay 方法應返回一個包含通道名稱和延遲值的陣列:
/**
 * 判斷通知的傳遞延遲。
 *
 * @return array
 */
public function withDelay(object $notifiable): array
{
    return [
        'mail' => now()->plus(minutes: 5),
        'sms' => now()->plus(minutes: 10),
    ];
}
自訂通知佇列連接
預設情況下,佇列通知將使用您應用程式的預設佇列連接放入佇列。如果您希望指定用於特定通知的不同連接,可以從通知的構造函數中呼叫 onConnection 方法:
<?php

namespace App\Notifications;

use Illuminate\Bus\Queueable;
use Illuminate\Contracts\Queue\ShouldQueue;
use Illuminate\Notifications\Notification;

class InvoicePaid extends Notification implements ShouldQueue
{
    use Queueable;

    /**
     * 建立一個新的通知實例。
     */
    public function __construct()
    {
        $this->onConnection('redis');
    }
}
或者,如果您希望指定用於通知支援的每個通知通道的特定佇列連接,可以在通知上定義一個 viaConnections 方法。此方法應返回一個通道名稱/佇列連接名稱對的陣列:
/**
 * 判斷每個通知通道應使用哪些連接。
 *
 * @return array
 */
public function viaConnections(): array
{
    return [
        'mail' => 'redis',
        'database' => 'sync',
    ];
}
自訂通知通道佇列
如果您希望指定用於通知支援的每個通知通道的特定佇列,可以在通知上定義一個 viaQueues 方法。此方法應返回一個通道名稱/佇列名稱對的陣列:
/**
 * 判斷每個通知通道應使用哪些佇列。
 *
 * @return array
 */
public function viaQueues(): array
{
    return [
        'mail' => 'mail-queue',
        'slack' => 'slack-queue',
    ];
}
自訂佇列通知作業屬性
您可以透過在通知類別上定義佇列屬性來自訂底層佇列作業的行為。這些屬性將被發送通知的佇列作業繼承:
<?php

namespace App\Notifications;

use Illuminate\Bus\Queueable;
use Illuminate\Contracts\Queue\ShouldQueue;
use Illuminate\Notifications\Notification;
use Illuminate\Queue\Attributes\MaxExceptions;
use Illuminate\Queue\Attributes\Timeout;
use Illuminate\Queue\Attributes\Tries;

#[Tries(5)]
#[Timeout(120)]
#[MaxExceptions(3)]
class InvoicePaid extends Notification implements ShouldQueue
{
    use Queueable;

    // ...
}
如果您希望透過加密來確保佇列通知資料的隱私性和完整性,請向通知類別添加 ShouldBeEncrypted 介面:
<?php

namespace App\Notifications;

use Illuminate\Bus\Queueable;
use Illuminate\Contracts\Queue\ShouldBeEncrypted;
use Illuminate\Contracts\Queue\ShouldQueue;
use Illuminate\Notifications\Notification;

class InvoicePaid extends Notification implements ShouldQueue, ShouldBeEncrypted
{
    use Queueable;

    // ...
}
除了在通知類別上直接定義這些屬性外,您還可以定義 backoff 和 retryUntil 方法來指定佇列通知作業的退避策略和重試逾時:
use DateTime;

/**
 * 計算在重試通知之前應等待的秒數。
 */
public function backoff(): int
{
    return 3;
}

/**
 * 判斷通知應逾時的時間。
 */
public function retryUntil(): DateTime
{
    return now()->plus(minutes: 5);
}
[!NOTE] 有關這些作業屬性和方法的更多資訊,請查閱有關佇列作業的文檔。
佇列通知中介層
佇列通知可以像佇列作業一樣定義中介層。首先,在通知類別上定義一個 middleware 方法。middleware 方法將接收 $notifiable 和 $channel 變數,允許您根據通知的目的地自訂返回的中介層:
use Illuminate\Queue\Middleware\RateLimited;

/**
 * 獲取通知作業應透過的中介層。
 *
 * @return array
 */
public function middleware(object $notifiable, string $channel)
{
    return match ($channel) {
        'mail' => [new RateLimited('postmark')],
        'slack' => [new RateLimited('slack')],
        default => [],
    };
}
佇列通知和資料庫交易
當佇列通知在資料庫交易內行被派發時,它們可能會在資料庫交易提交之前被佇列處理。當這種情況發生時,在資料庫交易期間對模型或資料庫記錄進行的任何更新可能尚未反映在資料庫中。此外,在交易內行建立的任何模型或資料庫記錄可能不存在於資料庫中。如果您的通知依賴這些模型,則在處理發送佇列通知的作業時可能會發生意外錯誤。
如果您的佇列連接的 after_commit 配置選項設定為 false,您仍然可以透過在發送通知時呼叫 afterCommit 方法來指示特定的佇列通知應在所有打開的資料庫交易提交後被派發:
use App\Notifications\InvoicePaid;

$user->notify((new InvoicePaid($invoice))->afterCommit());
或者,您可以從通知的構造函數中呼叫 afterCommit 方法:
<?php

namespace App\Notifications;

use Illuminate\Bus\Queueable;
use Illuminate\Contracts\Queue\ShouldQueue;
use Illuminate\Notifications\Notification;

class InvoicePaid extends Notification implements ShouldQueue
{
    use Queueable;

    /**
     * 建立一個新的通知實例。
     */
    public function __construct()
    {
        $this->afterCommit();
    }
}
[!NOTE] 要了解更多關於解決這些問題的資訊,請查閱有關佇列作業和資料庫交易的文檔。
判斷是否應發送佇列通知
佇列通知被派發到佇列以進行背景處理後,通常會被佇列工作者接受並發送給其預定收件者。
但是,如果您希望在佇列工作者處理佇列通知後對是否應發送該通知做出最終判斷,可以在通知類別上定義一個 shouldSend 方法。如果此方法返回 false,則不會發送通知:
/**
 * 判斷是否應發送通知。
 */
public function shouldSend(object $notifiable, string $channel): bool
{
    return $this->invoice->isPaid();
}
發送通知後
如果您希望在發送通知後執行代碼,可以在通知類別上定義一個 afterSending 方法。此方法將接收可通知實體、通道名稱和通道的回應:
/**
 * 在發送通知後處理通知。
 */
public function afterSending(object $notifiable, string $channel, mixed $response): void
{
    // ...
}
按需通知
有時您可能需要向未儲存為應用程式「使用者」的人發送通知。使用 Notification 外觀的 route 方法,您可以在發送通知之前指定臨時通知路由資訊:
use Illuminate\Broadcasting\Channel;
use Illuminate\Support\Facades\Notification;

Notification::route('mail', 'taylor@example.com')
    ->route('vonage', '5555555555')
    ->route('slack', '#slack-channel')
    ->route('broadcast', [new Channel('channel-name')])
    ->notify(new InvoicePaid($invoice));
如果您希望在向 mail 通道發送按需通知時提供收件者的名稱,您可以提供一個陣列,其中包含電子郵件地址作為鍵,名稱作為陣列第一個元素的值:
Notification::route('mail', [
    'barrett@example.com' => 'Barrett Blair',
])->notify(new InvoicePaid($invoice));
使用 routes 方法,您可以一次為多個通知通道提供臨時路由資訊:
Notification::routes([
    'mail' => ['barrett@example.com' => 'Barrett Blair'],
    'vonage' => '5555555555',
])->notify(new InvoicePaid($invoice));
郵件通知
格式化郵件訊息
如果通知支援作為電子郵件發送,您應該在通知類別上定義一個 toMail 方法。此方法將接收一個 $notifiable 實體,並應返回一個 Illuminate\Notifications\Messages\MailMessage 實例。
MailMessage 類別包含一些簡單的方法來幫助您建立交易電子郵件訊息。郵件訊息可以包含文字行以及「操作按鈕」。讓我們看看一個範例 toMail 方法:
/**
 * 獲取通知的郵件表示。
 */
public function toMail(object $notifiable): MailMessage
{
    $url = url('/invoice/'.$this->invoice->id);

    return (new MailMessage)
        ->greeting('Hello!')
        ->line('One of your invoices has been paid!')
        ->lineIf($this->amount > 0, "Amount paid: {$this->amount}")
        ->action('View Invoice', $url)
        ->line('Thank you for using our application!');
}
[!NOTE] 請注意,我們在
toMail方法中使用了$this->invoice->id。您可以將通知生成訊息所需的任何資料傳遞到通知的構造函數中。
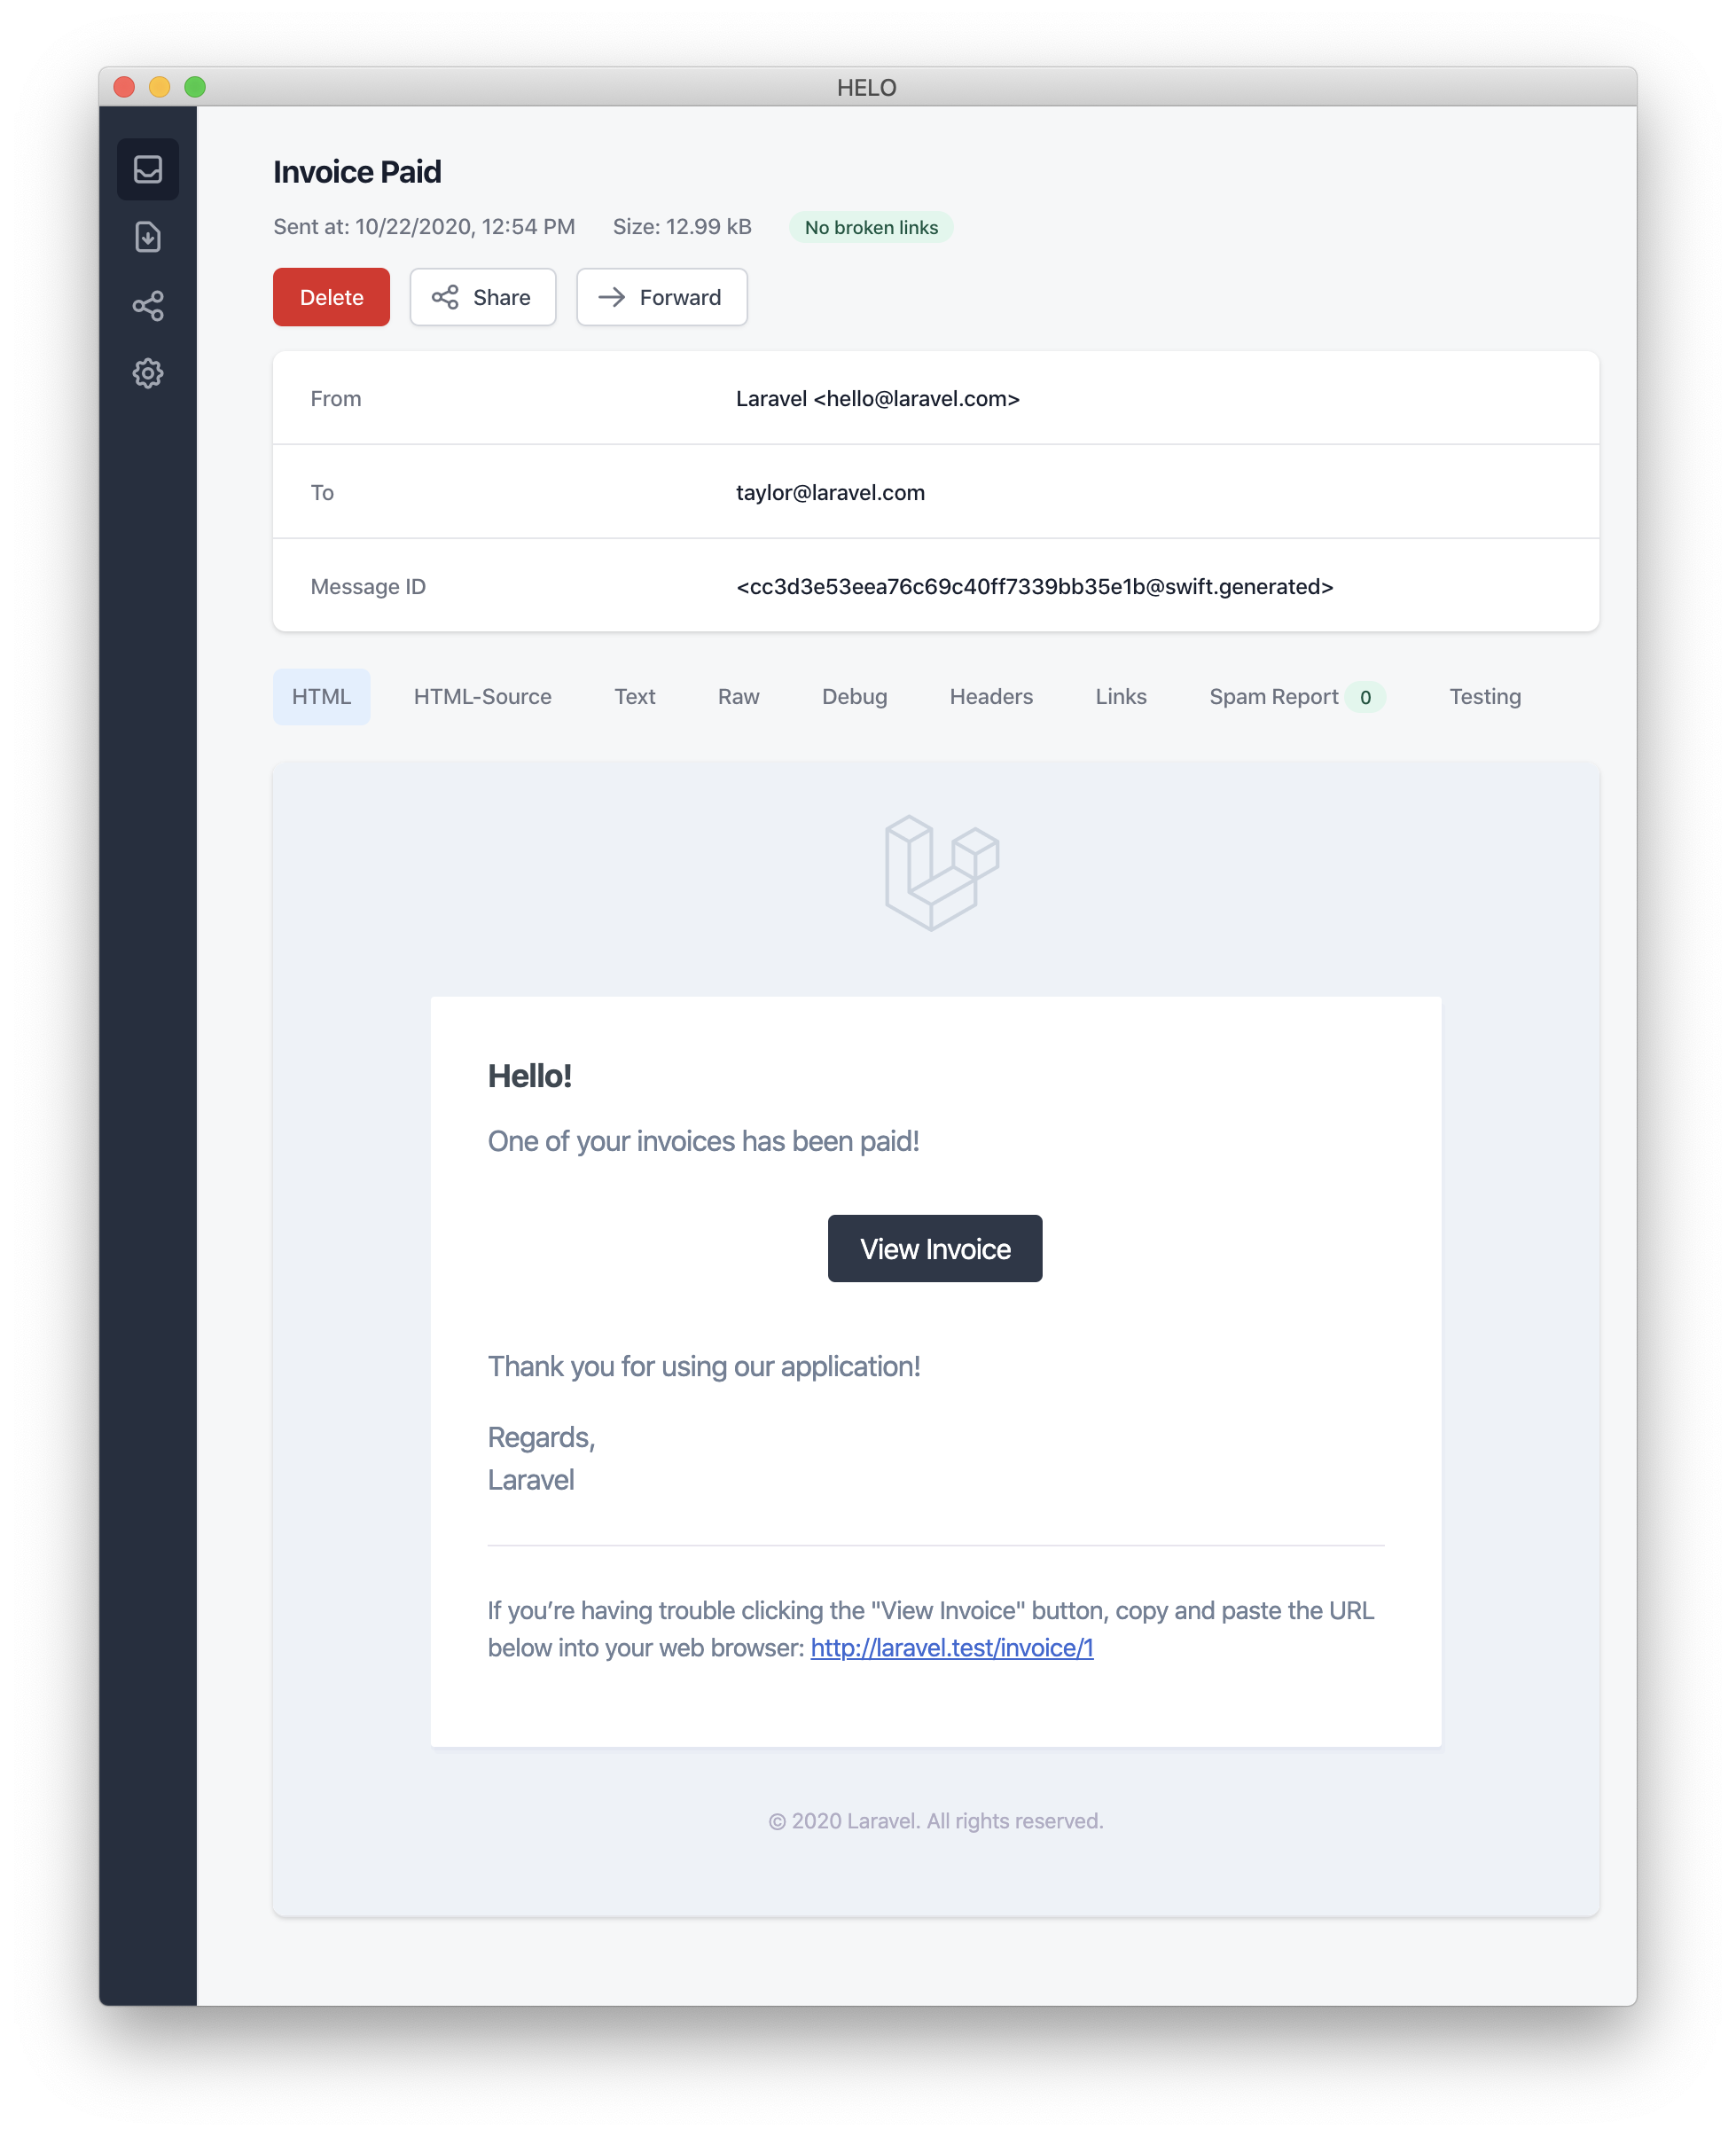
在此範例中,我們註冊了一個問候語、一行文字、一個操作按鈕,然後是另一行文字。MailMessage 物件提供的這些方法使格式化小型交易電子郵件變得簡單而快速。郵件通道然後會將訊息元件翻譯成漂亮、響應式的 HTML 電子郵件範本以及純文字對應物。以下是 mail 通道生成的電子郵件範例:
[!NOTE] 發送郵件通知時,請確保在
config/app.php配置檔案中設定name配置選項。此值將用於郵件通知訊息的頁眉和頁腳。
錯誤訊息
某些通知會通知使用者錯誤,例如發票付款失敗。您可以透過在建立訊息時呼叫 error 方法來指示郵件訊息是有關錯誤的。在郵件訊息上使用 error 方法時,操作按鈕將是紅色而不是黑色:
/**
 * 獲取通知的郵件表示。
 */
public function toMail(object $notifiable): MailMessage
{
    return (new MailMessage)
        ->error()
        ->subject('Invoice Payment Failed')
        ->line('...');
}
其他郵件通知格式化選項
與其在通知類別中定義文字的「行」,您可以使用 view 方法來指定應用於渲染通知電子郵件的自訂範本:
/**
 * 獲取通知的郵件表示。
 */
public function toMail(object $notifiable): MailMessage
{
    return (new MailMessage)->view(
        'mail.invoice.paid', ['invoice' => $this->invoice]
    );
}
您可以透過將視圖名稱作為傳遞給 view 方法的陣列的第二個元素來為郵件訊息指定純文字視圖:
/**
 * 獲取通知的郵件表示。
 */
public function toMail(object $notifiable): MailMessage
{
    return (new MailMessage)->view(
        ['mail.invoice.paid', 'mail.invoice.paid-text'],
        ['invoice' => $this->invoice]
    );
}
或者,如果您的訊息只有純文字視圖,您可以使用 text 方法:
/**
 * 獲取通知的郵件表示。
 */
public function toMail(object $notifiable): MailMessage
{
    return (new MailMessage)->text(
        'mail.invoice.paid-text', ['invoice' => $this->invoice]
    );
}
自訂寄件者
預設情況下,電子郵件的電子郵件的寄件者/寄件地址在 config/mail.php 配置檔案中定義。但是,您可以使用 from 方法為特定通知指定寄件地址:
/**
 * 獲取通知的郵件表示。
 */
public function toMail(object $notifiable): MailMessage
{
    return (new MailMessage)
        ->from('barrett@example.com', 'Barrett Blair')
        ->line('...');
}
自訂收件者
透過 mail 通道發送通知時,通知系統將自動在您的可通知實體上查找 email 屬性。您可以透過在可通知實體上定義 routeNotificationForMail 方法來自訂用於傳遞通知的電子郵件地址:
<?php

namespace App\Models;

use Illuminate\Foundation\Auth\User as Authenticatable;
use Illuminate\Notifications\Notifiable;
use Illuminate\Notifications\Notification;

class User extends Authenticatable
{
    use Notifiable;

    /**
     * 為郵件通道路由通知。
     *
     * @return  array|string
     */
    public function routeNotificationForMail(Notification $notification): array|string
    {
        // 僅返回電子郵件地址...
        return $this->email_address;

        // 返回電子郵件地址和名稱...
        return [$this->email_address => $this->name];
    }
}
自訂主旨
預設情況下,電子郵件的主旨是格式化為「標題大小寫」的通知類別名稱。因此,如果您的通知類別命名為 InvoicePaid,則電子郵件的主旨將是 Invoice Paid。如果您希望為訊息指定不同的主旨,可以在建立訊息時呼叫 subject 方法:
/**
 * 獲取通知的郵件表示。
 */
public function toMail(object $notifiable): MailMessage
{
    return (new MailMessage)
        ->subject('Notification Subject')
        ->line('...');
}
自訂郵件程式
預設情況下,郵件通知將使用 config/mail.php 配置檔案中定義的預設郵件程式發送。但是,您可以在運行時指定不同的郵件程式,方法是在建立訊息時呼叫 mailer 方法:
/**
 * 獲取通知的郵件表示。
 */
public function toMail(object $notifiable): MailMessage
{
    return (new MailMessage)
        ->mailer('postmark')
        ->line('...');
}
自訂範本
您可以透過發佈通知套件的資源來修改郵件通知使用的 HTML 和純文字範本。運行此命令後,郵件通知範本將位於 resources/views/vendor/notifications 目錄中:
php artisan vendor:publish --tag=laravel-notifications
附件
要向電子郵件通知添加附件,請在建立訊息時使用 attach 方法。attach 方法接受檔案的絕對路徑作為其第一個參數:
/**
 * 獲取通知的郵件表示。
 */
public function toMail(object $notifiable): MailMessage
{
    return (new MailMessage)
        ->greeting('Hello!')
        ->attach('/path/to/file');
}
將檔案附加到訊息時,您還可以透過向 attach 方法傳遞一個 array 作為第二個參數來指定顯示名稱和/或 MIME 類型:
/**
 * 獲取通知的郵件表示。
 */
public function toMail(object $notifiable): MailMessage
{
    return (new MailMessage)
        ->greeting('Hello!')
        ->attach('/path/to/file', [
            'as' => 'name.pdf',
            'mime' => 'application/pdf',
        ]);
}
必要時,可以使用 attachMany 方法向訊息附加多個檔案:
/**
 * 獲取通知的郵件表示。
 */
public function toMail(object $notifiable): MailMessage
{
    return (new MailMessage)
        ->greeting('Hello!')
        ->attachMany([
            '/path/to/forge.svg',
            '/path/to/vapor.svg' => [
                'as' => 'Logo.svg',
                'mime' => 'image/svg+xml',
            ],
        ]);
}
您可以使用 attachFromStorageDisk 方法來附加存在於特定文件系統磁碟上的檔案。此方法接受磁碟名稱和該磁碟上的檔案路徑:
use App\Mail\InvoicePaid as InvoicePaidMailable;

/**
 * 獲取通知的郵件表示。
 */
public function toMail(object $notifiable): Mailable
{
    return (new InvoicePaidMailable($this->invoice))
        ->to($notifiable->email)
        ->attachFromStorageDisk('s3', '/path/to/file', 'invoice.pdf', [
            'mime' => 'application/pdf',
        ]);
}
原始資料附件
attachData 方法可用於將原始位元組字串作為附件附加。呼叫 attachData 方法時,您應提供應分配給附件的檔名:
/**
 * 獲取通知的郵件表示。
 */
public function toMail(object $notifiable): MailMessage
{
    return (new MailMessage)
        ->greeting('Hello!')
        ->attachData($this->pdf, 'name.pdf', [
            'mime' => 'application/pdf',
        ]);
}
添加標籤和元資料
一些第三方電子郵件提供者(如 Mailgun 和 Postmark)支援訊息「標籤」和「元資料」,可用於對應用程式發送的電子郵件進行分組和追蹤。您可以透過 tag 和 metadata 方法向電子郵件訊息添加標籤和元資料:
/**
 * 獲取通知的郵件表示。
 */
public function toMail(object $notifiable): MailMessage
{
    return (new MailMessage)
        ->greeting('Comment Upvoted!')
        ->tag('upvote')
        ->metadata('comment_id', $this->comment->id);
}
如果您的應用程式正在使用 Mailgun 驅動程式,您可以查閱 Mailgun 的文檔以了解更多關於標籤和元資料的資訊。同樣,也可以查閱 Postmark 文檔以了解更多關於其對標籤和元資料支援的資訊。
如果您的應用程式正在使用 Amazon SES 傳送電子郵件,您應該使用 metadata 方法將 SES「標籤」附加到訊息。
自訂 Symfony 訊息
MailMessage 類別的 withSymfonyMessage 方法允許您註冊一個閉包,該閉包將在發送訊息之前與 Symfony Message 實例一起被呼叫。這為您提供了在傳遞訊息之前深度自訂訊息的機會:
use Symfony\Component\Mime\Email;

/**
 * 獲取通知的郵件表示。
 */
public function toMail(object $notifiable): MailMessage
{
    return (new MailMessage)
        ->withSymfonyMessage(function (Email $message) {
            $message->getHeaders()->addTextHeader(
                'Custom-Header', 'Header Value'
            );
        });
}
使用可郵寄物件
如果需要,您可以從通知的 toMail 方法返回一個完整的可郵寄物件。返回 Mailable 而不是 MailMessage 時,您需要使用可郵寄物件的 to 方法來指定訊息收件者:
use App\Mail\InvoicePaid as InvoicePaidMailable;
use Illuminate\Mail\Mailable;

/**
 * 獲取通知的郵件表示。
 */
public function toMail(object $notifiable): Mailable
{
    return (new InvoicePaidMailable($this->invoice))
        ->to($notifiable->email);
}
可郵寄物件和按需通知
如果您正在發送按需通知,則傳遞給 toMail 方法的 $notifiable 實例將是 Illuminate\Notifications\AnonymousNotifiable 的實例,該實例提供了一個 routeNotificationFor 方法,可用於檢索應發送按需通知的電子郵件地址:
use App\Mail\InvoicePaid as InvoicePaidMailable;
use Illuminate\Notifications\AnonymousNotifiable;
use Illuminate\Mail\Mailable;

/**
 * 獲取通知的郵件表示。
 */
public function toMail(object $notifiable): Mailable
{
    $address = $notifiable instanceof AnonymousNotifiable
        ? $notifiable->routeNotificationFor('mail')
        : $notifiable->email;

    return (new InvoicePaidMailable($this->invoice))
        ->to($address);
}
預覽郵件通知
設計郵件通知範本時,像典型的 Blade 範本一樣在瀏覽器中快速預覽渲染的郵件訊息是很方便的。為此,Laravel 允許您從路由閉包或控制器直接返回郵件通知生成的任何郵件訊息。當返回 MailMessage 時,它將被渲染並顯示在瀏覽器中,允許您快速預覽其設計而無需將其發送到實際的電子郵件地址:
use App\Models\Invoice;
use App\Notifications\InvoicePaid;

Route::get('/notification', function () {
    $invoice = Invoice::find(1);

    return (new InvoicePaid($invoice))
        ->toMail($invoice->user);
});
Markdown 郵件通知
Markdown 郵件通知允許您利用郵件通知的預建範本,同時給您更多自由來編寫更長、自訂的訊息。由於訊息是用 Markdown 編寫的,Laravel 能夠為訊息渲染漂亮、響應式的 HTML 範本,同時自動生成純文字對應物。
生成訊息
要生成具有相應 Markdown 範本的通知,您可以使用 make:notification Artisan 命令的 --markdown 選項:
php artisan make:notification InvoicePaid --markdown=mail.invoice.paid
像所有其他郵件通知一樣,使用 Markdown 範本的通知應在通知類別上定義一個 toMail 方法。但是,與其使用 line 和 action 方法來建立通知,不如使用 markdown 方法來指定應使用的 Markdown 範本的名稱。您可以作為方法的第二個參數傳遞您希望提供給範本的資料陣列:
/**
 * 獲取通知的郵件表示。
 */
public function toMail(object $notifiable): MailMessage
{
    $url = url('/invoice/'.$this->invoice->id);

    return (new MailMessage)
        ->subject('Invoice Paid')
        ->markdown('mail.invoice.paid', ['url' => $url]);
}
編寫訊息
Markdown 郵件通知使用 Blade 元件和 Markdown 語法的組合,允許您輕鬆建立通知,同時利用 Laravel 的預製通知元件:
# Invoice Paid

Your invoice has been paid!


View Invoice


Thanks,

{{ config('app.name') }}
[!NOTE] 編寫 Markdown 電子郵件時不要使用過多縮排。根據 Markdown 標準,Markdown 解析器會將縮排的內容渲染為代碼塊。
按鈕元件
按鈕元件渲染一個居中的按鈕連結。該元件接受兩個參數:url 和可選的 color。支援的顏色有 primary、green 和 red。您可以根據需要向通知添加任意數量的按鈕元件:
View Invoice
面板元件
面板元件在背景顏色與通知其餘部分略有不同的面板中渲染給定的文字塊。這使您可以引起對給定文字塊的注意:
This is the panel content.
表格元件
表格元件允許您將 Markdown 表格轉換為 HTML 表格。該元件接受 Markdown 表格作為其內容。表格欄位對齊使用預設的 Markdown 表格對齊語法支援:
| Laravel | Table | Example |
| ------------- | :-----------: | ------------: |
| Col 2 is | Centered | 通知
簡介
除了支援發送電子郵件外,Laravel 還支援透過各種傳遞通道發送通知,包括電子郵件、簡訊(透過 Vonage,前身為 Nexmo)和 Slack。此外,還建立了許多社群建立的通知通道,用於透過數十個不同的通道發送通知!通知也可以儲存在資料庫中,以便在您的 Web 介面中顯示。
通常,通知應為簡短的資訊訊息,用於通知使用者應用程式中發生的某些事件。例如,如果您正在編寫一個計費應用程式,您可能會透過電子郵件和簡訊通道向使用者發送「發票已付款」通知。
生成通知
在 Laravel 中,每個通知都由一個單獨的類別表示,該類別通常存儲在 app/Notifications 目錄中。如果您在應用程式中沒有看到此目錄,請不要擔心——當您運行 make:notification Artisan 命令時,它將為您建立:
php artisan make:notification InvoicePaid
此命令將在您的 app/Notifications 目錄中放置一個全新的通知類別。每個通知類別包含一個 via 方法和可變數量的訊息建立方法(例如 toMail 或 toDatabase),這些方法將通知轉換為針對特定通道量身定制的訊息。
發送通知
使用 Notifiable Trait
通知可以透過兩種方式發送:使用 Notifiable trait 的 notify 方法或使用 Notification外觀。Notifiable trait 預設包含在您應用程式的 App\Models\User 模型上:
<?php
namespace App\Models;
use Illuminate\Foundation\Auth\User as Authenticatable;
use Illuminate\Notifications\Notifiable;
class User extends Authenticatable
{
use Notifiable;
}
此 trait 提供的 notify 方法期望接收一個通知實例:
use App\Notifications\InvoicePaid;
$user->notify(new InvoicePaid($invoice));
[!NOTE]
請記住,您可以在任何模型上使用 Notifiable trait。您不僅限於將其包含在 User 模型上。
使用 Notification 外觀
或者,您可以透過 Notification外觀發送通知。當您需要向多個可通知實體(例如使用者集合)發送通知時,此方法很有用。要使用外觀發送通知,請將所有可通知實體和通知實例傳遞給 send 方法:
use Illuminate\Support\Facades\Notification;
Notification::send($users, new InvoicePaid($invoice));
您還可以使用 sendNow 方法立即發送通知。即使通知實現了 ShouldQueue 介面,此方法也會立即發送通知:
Notification::sendNow($developers, new DeploymentCompleted($deployment));
指定傳遞通道
每個通知類別都有一個 via 方法,用於確定通知將在哪些通道上傳遞。通知可以在 mail、database、broadcast、vonage 和 slack 通道上發送。
[!NOTE]
如果您想使用其他傳遞通道(如 Telegram 或 Pusher),請查看社群驅動的 Laravel Notification Channels 網站。
via 方法接收一個 $notifiable 實例,它將是發送通知的類別的實例。您可以使用 $notifiable 來判斷通知應在哪些通道上傳遞:
/**
* 獲取通知的傳遞通道。
*
* @return array
*/
public function via(object $notifiable): array
{
return $notifiable->prefers_sms ? ['vonage'] : ['mail', 'database'];
}
通知佇列
[!WARNING]
在將通知放入佇列之前,您應該配置您的佇列並啟動一個工作者。
發送通知可能需要時間,特別是當通道需要進行外部 API 呼叫來傳遞通知時。為了加快應用程式的回應時間,您可以透過向類別添加 ShouldQueue 介面和 Queueable trait 來使通知被放入佇列。對於使用 make:notification 命令生成的所有通知,該介面和 trait 已經被導入,因此您可以立即將它們添加到您的通知類別:
<?php
namespace App\Notifications;
use Illuminate\Bus\Queueable;
use Illuminate\Contracts\Queue\ShouldQueue;
use Illuminate\Notifications\Notification;
class InvoicePaid extends Notification implements ShouldQueue
{
use Queueable;
// ...
}
將 ShouldQueue 介面添加到通知後,您可以像平常一樣發送通知。Laravel 將檢測類別上的 ShouldQueue 介面,並自動將通知的傳遞放入佇列:
$user->notify(new InvoicePaid($invoice));
將通知放入佇列時,將為每個收件者和通道組合建立一個佇列作業。例如,如果您的通知有三個收件者和兩個通道,將有六個作業被派發到佇列。
延遲通知
如果您希望延遲通知的傳遞,可以在通知實例化上鏈式呼叫 delay 方法:
$delay = now()->plus(minutes: 10);
$user->notify((new InvoicePaid($invoice))->delay($delay));
您可以向 delay 方法傳遞一個陣列來指定特定通道的延遲時間:
$user->notify((new InvoicePaid($invoice))->delay([
'mail' => now()->plus(minutes: 5),
'sms' => now()->plus(minutes: 10),
]));
或者,您可以在通知類別本身上定義一個 withDelay 方法。withDelay 方法應返回一個包含通道名稱和延遲值的陣列:
/**
* 判斷通知的傳遞延遲。
*
* @return array
*/
public function withDelay(object $notifiable): array
{
return [
'mail' => now()->plus(minutes: 5),
'sms' => now()->plus(minutes: 10),
];
}
自訂通知佇列連接
預設情況下,佇列通知將使用您應用程式的預設佇列連接放入佇列。如果您希望指定用於特定通知的不同連接,可以從通知的構造函數中呼叫 onConnection 方法:
<?php
namespace App\Notifications;
use Illuminate\Bus\Queueable;
use Illuminate\Contracts\Queue\ShouldQueue;
use Illuminate\Notifications\Notification;
class InvoicePaid extends Notification implements ShouldQueue
{
use Queueable;
/**
* 建立一個新的通知實例。
*/
public function __construct()
{
$this->onConnection('redis');
}
}
或者,如果您希望指定用於通知支援的每個通知通道的特定佇列連接,可以在通知上定義一個 viaConnections 方法。此方法應返回一個通道名稱/佇列連接名稱對的陣列:
/**
* 判斷每個通知通道應使用哪些連接。
*
* @return array
*/
public function viaConnections(): array
{
return [
'mail' => 'redis',
'database' => 'sync',
];
}
自訂通知通道佇列
如果您希望指定用於通知支援的每個通知通道的特定佇列,可以在通知上定義一個 viaQueues 方法。此方法應返回一個通道名稱/佇列名稱對的陣列:
/**
* 判斷每個通知通道應使用哪些佇列。
*
* @return array
*/
public function viaQueues(): array
{
return [
'mail' => 'mail-queue',
'slack' => 'slack-queue',
];
}
自訂佇列通知作業屬性
您可以透過在通知類別上定義佇列屬性來自訂底層佇列作業的行為。這些屬性將被發送通知的佇列作業繼承:
<?php
namespace App\Notifications;
use Illuminate\Bus\Queueable;
use Illuminate\Contracts\Queue\ShouldQueue;
use Illuminate\Notifications\Notification;
use Illuminate\Queue\Attributes\MaxExceptions;
use Illuminate\Queue\Attributes\Timeout;
use Illuminate\Queue\Attributes\Tries;
#[Tries(5)]
#[Timeout(120)]
#[MaxExceptions(3)]
class InvoicePaid extends Notification implements ShouldQueue
{
use Queueable;
// ...
}
如果您希望透過加密來確保佇列通知資料的隱私性和完整性,請向通知類別添加 ShouldBeEncrypted 介面:
<?php
namespace App\Notifications;
use Illuminate\Bus\Queueable;
use Illuminate\Contracts\Queue\ShouldBeEncrypted;
use Illuminate\Contracts\Queue\ShouldQueue;
use Illuminate\Notifications\Notification;
class InvoicePaid extends Notification implements ShouldQueue, ShouldBeEncrypted
{
use Queueable;
// ...
}
除了在通知類別上直接定義這些屬性外,您還可以定義 backoff 和 retryUntil 方法來指定佇列通知作業的退避策略和重試逾時:
use DateTime;
/**
* 計算在重試通知之前應等待的秒數。
*/
public function backoff(): int
{
return 3;
}
/**
* 判斷通知應逾時的時間。
*/
public function retryUntil(): DateTime
{
return now()->plus(minutes: 5);
}
[!NOTE]
有關這些作業屬性和方法的更多資訊,請查閱有關佇列作業的文檔。
佇列通知中介層
佇列通知可以像佇列作業一樣定義中介層。首先,在通知類別上定義一個 middleware 方法。middleware 方法將接收 $notifiable 和 $channel 變數,允許您根據通知的目的地自訂返回的中介層:
use Illuminate\Queue\Middleware\RateLimited;
/**
* 獲取通知作業應透過的中介層。
*
* @return array
*/
public function middleware(object $notifiable, string $channel)
{
return match ($channel) {
'mail' => [new RateLimited('postmark')],
'slack' => [new RateLimited('slack')],
default => [],
};
}
佇列通知和資料庫交易
當佇列通知在資料庫交易內行被派發時,它們可能會在資料庫交易提交之前被佇列處理。當這種情況發生時,在資料庫交易期間對模型或資料庫記錄進行的任何更新可能尚未反映在資料庫中。此外,在交易內行建立的任何模型或資料庫記錄可能不存在於資料庫中。如果您的通知依賴這些模型,則在處理發送佇列通知的作業時可能會發生意外錯誤。
如果您的佇列連接的 after_commit 配置選項設定為 false,您仍然可以透過在發送通知時呼叫 afterCommit 方法來指示特定的佇列通知應在所有打開的資料庫交易提交後被派發:
use App\Notifications\InvoicePaid;
$user->notify((new InvoicePaid($invoice))->afterCommit());
或者,您可以從通知的構造函數中呼叫 afterCommit 方法:
<?php
namespace App\Notifications;
use Illuminate\Bus\Queueable;
use Illuminate\Contracts\Queue\ShouldQueue;
use Illuminate\Notifications\Notification;
class InvoicePaid extends Notification implements ShouldQueue
{
use Queueable;
/**
* 建立一個新的通知實例。
*/
public function __construct()
{
$this->afterCommit();
}
}
[!NOTE]
要了解更多關於解決這些問題的資訊,請查閱有關佇列作業和資料庫交易的文檔。
判斷是否應發送佇列通知
佇列通知被派發到佇列以進行背景處理後,通常會被佇列工作者接受並發送給其預定收件者。
但是,如果您希望在佇列工作者處理佇列通知後對是否應發送該通知做出最終判斷,可以在通知類別上定義一個 shouldSend 方法。如果此方法返回 false,則不會發送通知:
/**
* 判斷是否應發送通知。
*/
public function shouldSend(object $notifiable, string $channel): bool
{
return $this->invoice->isPaid();
}
發送通知後
如果您希望在發送通知後執行代碼,可以在通知類別上定義一個 afterSending 方法。此方法將接收可通知實體、通道名稱和通道的回應:
/**
* 在發送通知後處理通知。
*/
public function afterSending(object $notifiable, string $channel, mixed $response): void
{
// ...
}
按需通知
有時您可能需要向未儲存為應用程式「使用者」的人發送通知。使用 Notification 外觀的 route 方法,您可以在發送通知之前指定臨時通知路由資訊:
use Illuminate\Broadcasting\Channel;
use Illuminate\Support\Facades\Notification;
Notification::route('mail', 'taylor@example.com')
->route('vonage', '5555555555')
->route('slack', '#slack-channel')
->route('broadcast', [new Channel('channel-name')])
->notify(new InvoicePaid($invoice));
如果您希望在向 mail 通道發送按需通知時提供收件者的名稱,您可以提供一個陣列,其中包含電子郵件地址作為鍵,名稱作為陣列第一個元素的值:
Notification::route('mail', [
'barrett@example.com' => 'Barrett Blair',
])->notify(new InvoicePaid($invoice));
使用 routes 方法,您可以一次為多個通知通道提供臨時路由資訊:
Notification::routes([
'mail' => ['barrett@example.com' => 'Barrett Blair'],
'vonage' => '5555555555',
])->notify(new InvoicePaid($invoice));
郵件通知
格式化郵件訊息
如果通知支援作為電子郵件發送,您應該在通知類別上定義一個 toMail 方法。此方法將接收一個 $notifiable 實體,並應返回一個 Illuminate\Notifications\Messages\MailMessage 實例。
MailMessage 類別包含一些簡單的方法來幫助您建立交易電子郵件訊息。郵件訊息可以包含文字行以及「操作按鈕」。讓我們看看一個範例 toMail 方法:
/**
* 獲取通知的郵件表示。
*/
public function toMail(object $notifiable): MailMessage
{
$url = url('/invoice/'.$this->invoice->id);
return (new MailMessage)
->greeting('Hello!')
->line('One of your invoices has been paid!')
->lineIf($this->amount > 0, "Amount paid: {$this->amount}")
->action('View Invoice', $url)
->line('Thank you for using our application!');
}
[!NOTE]
請注意,我們在 toMail 方法中使用了 $this->invoice->id。您可以將通知生成訊息所需的任何資料傳遞到通知的構造函數中。
在此範例中,我們註冊了一個問候語、一行文字、一個操作按鈕,然後是另一行文字。MailMessage 物件提供的這些方法使格式化小型交易電子郵件變得簡單而快速。郵件通道然後會將訊息元件翻譯成漂亮、響應式的 HTML 電子郵件範本以及純文字對應物。以下是 mail 通道生成的電子郵件範例:
[!NOTE]
發送郵件通知時,請確保在 config/app.php 配置檔案中設定 name 配置選項。此值將用於郵件通知訊息的頁眉和頁腳。
錯誤訊息
某些通知會通知使用者錯誤,例如發票付款失敗。您可以透過在建立訊息時呼叫 error 方法來指示郵件訊息是有關錯誤的。在郵件訊息上使用 error 方法時,操作按鈕將是紅色而不是黑色:
/**
* 獲取通知的郵件表示。
*/
public function toMail(object $notifiable): MailMessage
{
return (new MailMessage)
->error()
->subject('Invoice Payment Failed')
->line('...');
}
其他郵件通知格式化選項
與其在通知類別中定義文字的「行」,您可以使用 view 方法來指定應用於渲染通知電子郵件的自訂範本:
/**
* 獲取通知的郵件表示。
*/
public function toMail(object $notifiable): MailMessage
{
return (new MailMessage)->view(
'mail.invoice.paid', ['invoice' => $this->invoice]
);
}
您可以透過將視圖名稱作為傳遞給 view 方法的陣列的第二個元素來為郵件訊息指定純文字視圖:
/**
* 獲取通知的郵件表示。
*/
public function toMail(object $notifiable): MailMessage
{
return (new MailMessage)->view(
['mail.invoice.paid', 'mail.invoice.paid-text'],
['invoice' => $this->invoice]
);
}
或者,如果您的訊息只有純文字視圖,您可以使用 text 方法:
/**
* 獲取通知的郵件表示。
*/
public function toMail(object $notifiable): MailMessage
{
return (new MailMessage)->text(
'mail.invoice.paid-text', ['invoice' => $this->invoice]
);
}
自訂寄件者
預設情況下,電子郵件的電子郵件的寄件者/寄件地址在 config/mail.php 配置檔案中定義。但是,您可以使用 from 方法為特定通知指定寄件地址:
/**
* 獲取通知的郵件表示。
*/
public function toMail(object $notifiable): MailMessage
{
return (new MailMessage)
->from('barrett@example.com', 'Barrett Blair')
->line('...');
}
自訂收件者
透過 mail 通道發送通知時,通知系統將自動在您的可通知實體上查找 email 屬性。您可以透過在可通知實體上定義 routeNotificationForMail 方法來自訂用於傳遞通知的電子郵件地址:
<?php
namespace App\Models;
use Illuminate\Foundation\Auth\User as Authenticatable;
use Illuminate\Notifications\Notifiable;
use Illuminate\Notifications\Notification;
class User extends Authenticatable
{
use Notifiable;
/**
* 為郵件通道路由通知。
*
* @return array|string
*/
public function routeNotificationForMail(Notification $notification): array|string
{
// 僅返回電子郵件地址...
return $this->email_address;
// 返回電子郵件地址和名稱...
return [$this->email_address => $this->name];
}
}
自訂主旨
預設情況下,電子郵件的主旨是格式化為「標題大小寫」的通知類別名稱。因此,如果您的通知類別命名為 InvoicePaid,則電子郵件的主旨將是 Invoice Paid。如果您希望為訊息指定不同的主旨,可以在建立訊息時呼叫 subject 方法:
/**
* 獲取通知的郵件表示。
*/
public function toMail(object $notifiable): MailMessage
{
return (new MailMessage)
->subject('Notification Subject')
->line('...');
}
自訂郵件程式
預設情況下,郵件通知將使用 config/mail.php 配置檔案中定義的預設郵件程式發送。但是,您可以在運行時指定不同的郵件程式,方法是在建立訊息時呼叫 mailer 方法:
/**
* 獲取通知的郵件表示。
*/
public function toMail(object $notifiable): MailMessage
{
return (new MailMessage)
->mailer('postmark')
->line('...');
}
自訂範本
您可以透過發佈通知套件的資源來修改郵件通知使用的 HTML 和純文字範本。運行此命令後,郵件通知範本將位於 resources/views/vendor/notifications 目錄中:
php artisan vendor:publish --tag=laravel-notifications
附件
要向電子郵件通知添加附件,請在建立訊息時使用 attach 方法。attach 方法接受檔案的絕對路徑作為其第一個參數:
/**
* 獲取通知的郵件表示。
*/
public function toMail(object $notifiable): MailMessage
{
return (new MailMessage)
->greeting('Hello!')
->attach('/path/to/file');
}
將檔案附加到訊息時,您還可以透過向 attach 方法傳遞一個 array 作為第二個參數來指定顯示名稱和/或 MIME 類型:
/**
* 獲取通知的郵件表示。
*/
public function toMail(object $notifiable): MailMessage
{
return (new MailMessage)
->greeting('Hello!')
->attach('/path/to/file', [
'as' => 'name.pdf',
'mime' => 'application/pdf',
]);
}
必要時,可以使用 attachMany 方法向訊息附加多個檔案:
/**
* 獲取通知的郵件表示。
*/
public function toMail(object $notifiable): MailMessage
{
return (new MailMessage)
->greeting('Hello!')
->attachMany([
'/path/to/forge.svg',
'/path/to/vapor.svg' => [
'as' => 'Logo.svg',
'mime' => 'image/svg+xml',
],
]);
}
您可以使用 attachFromStorageDisk 方法來附加存在於特定文件系統磁碟上的檔案。此方法接受磁碟名稱和該磁碟上的檔案路徑:
use App\Mail\InvoicePaid as InvoicePaidMailable;
/**
* 獲取通知的郵件表示。
*/
public function toMail(object $notifiable): Mailable
{
return (new InvoicePaidMailable($this->invoice))
->to($notifiable->email)
->attachFromStorageDisk('s3', '/path/to/file', 'invoice.pdf', [
'mime' => 'application/pdf',
]);
}
原始資料附件
attachData 方法可用於將原始位元組字串作為附件附加。呼叫 attachData 方法時,您應提供應分配給附件的檔名:
/**
* 獲取通知的郵件表示。
*/
public function toMail(object $notifiable): MailMessage
{
return (new MailMessage)
->greeting('Hello!')
->attachData($this->pdf, 'name.pdf', [
'mime' => 'application/pdf',
]);
}
添加標籤和元資料
一些第三方電子郵件提供者(如 Mailgun 和 Postmark)支援訊息「標籤」和「元資料」,可用於對應用程式發送的電子郵件進行分組和追蹤。您可以透過 tag 和 metadata 方法向電子郵件訊息添加標籤和元資料:
/**
* 獲取通知的郵件表示。
*/
public function toMail(object $notifiable): MailMessage
{
return (new MailMessage)
->greeting('Comment Upvoted!')
->tag('upvote')
->metadata('comment_id', $this->comment->id);
}
如果您的應用程式正在使用 Mailgun 驅動程式,您可以查閱 Mailgun 的文檔以了解更多關於標籤和元資料的資訊。同樣,也可以查閱 Postmark 文檔以了解更多關於其對標籤和元資料支援的資訊。
如果您的應用程式正在使用 Amazon SES 傳送電子郵件,您應該使用 metadata 方法將 SES「標籤」附加到訊息。
自訂 Symfony 訊息
MailMessage 類別的 withSymfonyMessage 方法允許您註冊一個閉包,該閉包將在發送訊息之前與 Symfony Message 實例一起被呼叫。這為您提供了在傳遞訊息之前深度自訂訊息的機會:
use Symfony\Component\Mime\Email;
/**
* 獲取通知的郵件表示。
*/
public function toMail(object $notifiable): MailMessage
{
return (new MailMessage)
->withSymfonyMessage(function (Email $message) {
$message->getHeaders()->addTextHeader(
'Custom-Header', 'Header Value'
);
});
}
使用可郵寄物件
如果需要,您可以從通知的 toMail 方法返回一個完整的可郵寄物件。返回 Mailable 而不是 MailMessage 時,您需要使用可郵寄物件的 to 方法來指定訊息收件者:
use App\Mail\InvoicePaid as InvoicePaidMailable;
use Illuminate\Mail\Mailable;
/**
* 獲取通知的郵件表示。
*/
public function toMail(object $notifiable): Mailable
{
return (new InvoicePaidMailable($this->invoice))
->to($notifiable->email);
}
可郵寄物件和按需通知
如果您正在發送按需通知,則傳遞給 toMail 方法的 $notifiable 實例將是 Illuminate\Notifications\AnonymousNotifiable 的實例,該實例提供了一個 routeNotificationFor 方法,可用於檢索應發送按需通知的電子郵件地址:
use App\Mail\InvoicePaid as InvoicePaidMailable;
use Illuminate\Notifications\AnonymousNotifiable;
use Illuminate\Mail\Mailable;
/**
* 獲取通知的郵件表示。
*/
public function toMail(object $notifiable): Mailable
{
$address = $notifiable instanceof AnonymousNotifiable
? $notifiable->routeNotificationFor('mail')
: $notifiable->email;
return (new InvoicePaidMailable($this->invoice))
->to($address);
}
預覽郵件通知
設計郵件通知範本時,像典型的 Blade 範本一樣在瀏覽器中快速預覽渲染的郵件訊息是很方便的。為此,Laravel 允許您從路由閉包或控制器直接返回郵件通知生成的任何郵件訊息。當返回 MailMessage 時,它將被渲染並顯示在瀏覽器中,允許您快速預覽其設計而無需將其發送到實際的電子郵件地址:
use App\Models\Invoice;
use App\Notifications\InvoicePaid;
Route::get('/notification', function () {
$invoice = Invoice::find(1);
return (new InvoicePaid($invoice))
->toMail($invoice->user);
});
Markdown 郵件通知
Markdown 郵件通知允許您利用郵件通知的預建範本,同時給您更多自由來編寫更長、自訂的訊息。由於訊息是用 Markdown 編寫的,Laravel 能夠為訊息渲染漂亮、響應式的 HTML 範本,同時自動生成純文字對應物。
生成訊息
要生成具有相應 Markdown 範本的通知,您可以使用 make:notification Artisan 命令的 --markdown 選項:
php artisan make:notification InvoicePaid --markdown=mail.invoice.paid
像所有其他郵件通知一樣,使用 Markdown 範本的通知應在通知類別上定義一個 toMail 方法。但是,與其使用 line 和 action 方法來建立通知,不如使用 markdown 方法來指定應使用的 Markdown 範本的名稱。您可以作為方法的第二個參數傳遞您希望提供給範本的資料陣列:
/**
* 獲取通知的郵件表示。
*/
public function toMail(object $notifiable): MailMessage
{
$url = url('/invoice/'.$this->invoice->id);
return (new MailMessage)
->subject('Invoice Paid')
->markdown('mail.invoice.paid', ['url' => $url]);
}
編寫訊息
Markdown 郵件通知使用 Blade 元件和 Markdown 語法的組合,允許您輕鬆建立通知,同時利用 Laravel 的預製通知元件:
# Invoice Paid
Your invoice has been paid!
View Invoice
Thanks,
{{ config('app.name') }}
[!NOTE]
編寫 Markdown 電子郵件時不要使用過多縮排。根據 Markdown 標準,Markdown 解析器會將縮排的內容渲染為代碼塊。
按鈕元件
按鈕元件渲染一個居中的按鈕連結。該元件接受兩個參數:url 和可選的 color。支援的顏色有 primary、green 和 red。您可以根據需要向通知添加任意數量的按鈕元件:
View Invoice
面板元件
面板元件在背景顏色與通知其餘部分略有不同的面板中渲染給定的文字塊。這使您可以引起對給定文字塊的注意:
This is the panel content.
表格元件
表格元件允許您將 Markdown 表格轉換為 HTML 表格。該元件接受 Markdown 表格作為其內容。表格欄位對齊使用預設的 Markdown 表格對齊語法支援:
| Laravel | Table | Example |
| ------------- | :-----------: | ------------: |
| Col 2 is | Centered | $10 |
| Col 3 is | Right-Aligned | $20 |
自訂元件
您可以匯出所有 Markdown 通知元件到您自己的應用程式以進行自訂。要匯出元件,請使用 vendor:publish Artisan 命令來發佈 laravel-mail 資產標籤:
php artisan vendor:publish --tag=laravel-mail
此命令將 Markdown 郵件元件發佈到 resources/views/vendor/mail 目錄。mail 目錄將包含一個 html 和一個 text 目錄,每個目錄都包含每個可用元件的各自表示。您可以根據需要自由地自訂這些元件。
自訂 CSS
匯出元件後,resources/views/vendor/mail/html/themes 目錄將包含一個 default.css 檔案。您可以自訂此檔案中的 CSS,您的樣式將自動內聯到 Markdown 通知的 HTML 表示中。
如果您希望為 Laravel 的 Markdown 元件建立一個全新的主題,可以將 CSS 檔案放在 html/themes 目錄中。命名並儲存 CSS 檔案後,更新 mail 配置檔案的 theme 選項以匹配您新主題的名稱。
要自訂個別通知的主題,可以在建立通知的郵件訊息時呼叫 theme 方法。theme 方法接受發送通知時應使用的主題名稱:
/**
 * 獲取通知的郵件表示。
 */
public function toMail(object $notifiable): MailMessage
{
    return (new MailMessage)
        ->theme('invoice')
        ->subject('Invoice Paid')
        ->markdown('mail.invoice.paid', ['url' => $url]);
}
資料庫通知
先決條件
database 通知通道將通知資訊儲存在資料庫表中。此表將包含有關通知類型的資訊以及描述通知的 JSON 資料結構。
您可以查詢該表以在應用程式的使用者介面中顯示通知。但是,在執行此操作之前,您需要建立一個資料庫表來保存您的通知。您可以使用 make:notifications-table 命令來生成具有適當表架構的遷移:
php artisan make:notifications-table

php artisan migrate
[!NOTE]
如果您的可通知模型正在使用 UUID 或 ULID 主鍵,您應該在通知表遷移中將 morphs 方法替換為 uuidMorphs 或 ulidMorphs。
格式化資料庫通知
如果通知支援儲存在資料庫表中,您應該在通知類別上定義一個 toDatabase 或 toArray 方法。此方法將接收一個 $notifiable 實體,並應返回一個純 PHP 陣列。返回的陣列將被編碼為 JSON 並儲存在 notifications 表的 data 欄位中。讓我們看看一個範例 toArray 方法:
/**
 * 獲取通知的陣列表示。
 *
 * @return array
 */
public function toArray(object $notifiable): array
{
    return [
        'invoice_id' => $this->invoice->id,
        'amount' => $this->invoice->amount,
    ];
}
當通知儲存在應用程式的資料庫中時,type 欄位預設將被設定為通知的類別名稱,而 read_at 欄位將為 null。但是,您可以透過在通知類別中定義 databaseType 和 initialDatabaseReadAtValue 方法來自訂此行為:
use Illuminate\Support\Carbon;

/**
 * 獲取通知的資料庫類型。
 */
public function databaseType(object $notifiable): string
{
    return 'invoice-paid';
}

/**
 * 獲取「read_at」欄位的初始值。
 */
public function initialDatabaseReadAtValue(): ?Carbon
{
    return null;
}
toDatabase vs. toArray
toArray 方法也被 broadcast 通道用於判斷應向您的 JavaScript 前端廣播哪些資料。如果您希望為 database 和 broadcast 通道有不同的陣列表示,您應該定義一個 toDatabase 方法而不是 toArray 方法。
存取通知
通知儲存在資料庫中後,您需要一種便利的方式從可通知實體中存取它們。Illuminate\Notifications\Notifiable trait 包含在 Laravel 的預設 App\Models\User 模型中,它包含一個 notifications Eloquent 關聯,該關聯返回實體的通知。要獲取通知,您可以像任何其他 Eloquent 關聯一樣存取此方法。預設情況下,通知將按 created_at 時間戳排序,最新的通知位於集合的開頭:
$user = App\Models\User::find(1);

foreach ($user->notifications as $notification) {
    echo $notification->type;
}
如果您只想檢索「未讀」通知,可以使用 unreadNotifications 關聯。同樣,這些通知將按 created_at 時間戳排序,最新的通知位於集合的開頭:
$user = App\Models\User::find(1);

foreach ($user->unreadNotifications as $notification) {
    echo $notification->type;
}
如果您只想檢索「已讀」通知,可以使用 readNotifications 關聯:
$user = App\Models\User::find(1);

foreach ($user->readNotifications as $notification) {
    echo $notification->type;
}
[!NOTE]
要從您的 JavaScript 客戶端存取通知,您應該為應用程式定義一個通知控制器,該控制器返回可通知實體(如當前使用者)的通知。然後,您可以從 JavaScript 客戶端向該控制器的 URL 發出 HTTP 請求。
將通知標記為已讀
通常,您會希望在使用者查看通知時將其標記為「已讀」。Illuminate\Notifications\Notifiable trait 提供了一個 markAsRead 方法,它會更新通知資料庫記錄上的 read_at 欄位:
$user = App\Models\User::find(1);

foreach ($user->unreadNotifications as $notification) {
    $notification->markAsRead();
}
但是,與其循環遍歷每個通知,您可以直接在通知集合上使用 markAsRead 方法:
$user->unreadNotifications->markAsRead();
您還可以使用批量更新查詢來將所有通知標記為已讀,而無需從資料庫中檢索它們:
$user = App\Models\User::find(1);

$user->unreadNotifications()->update(['read_at' => now()]);
您可以 delete 通知以完全從表中移除它們:
$user->notifications()->delete();
廣播通知
先決條件
廣播通知之前,您應該配置並熟悉 Laravel 的事件廣播服務。事件廣播提供了一種從您的 JavaScript 前端回應伺服器端 Laravel 事件的方式。
格式化廣播通知
broadcast 通道使用 Laravel 的事件廣播服務廣播通知,允許您的 JavaScript 前端即時捕獲通知。如果通知支援廣播,您可以在通知類別上定義一個 toBroadcast 方法。此方法將接收一個 $notifiable 實體,並應返回一個 BroadcastMessage 實例。如果 toBroadcast 方法不存在,則 toArray 方法將用於收集應廣播的資料。返回的資料將被編碼為 JSON 並廣播到您的 JavaScript 前端。讓我們看看一個範例 toBroadcast 方法:
use Illuminate\Notifications\Messages\BroadcastMessage;

/**
 * 獲取通知的可廣播表示。
 */
public function toBroadcast(object $notifiable): BroadcastMessage
{
    return new BroadcastMessage([
        'invoice_id' => $this->invoice->id,
        'amount' => $this->invoice->amount,
    ]);
}
廣播佇列配置
所有廣播通知都被放入佇列以進行廣播。如果您希望配置用於佇列廣播操作的佇列連接或佇列名稱,可以使用 BroadcastMessage 的 onConnection 和 onQueue 方法:
return (new BroadcastMessage($data))
    ->onConnection('sqs')
    ->onQueue('broadcasts');
自訂通知類型
除了您指定的資料外,所有廣播通知還有一個包含通知完整類別名稱的 type 欄位。如果您希望自訂通知 type,可以在通知類別上定義一個 broadcastType 方法:
/**
 * 獲取正在廣播的通知的類型。
 */
public function broadcastType(): string
{
    return 'broadcast.message';
}
監聽通知
通知將在使用 {notifiable}.{id} 約定格式化的私有頻道上廣播。因此,如果您正在向 ID 為 1 的 App\Models\User 實例發送通知,則通知將在 App.Models.User.1 私有頻道上廣播。使用 Laravel Echo 時,您可以使用 notification 方法輕鬆地在頻道上監聽通知:
Echo.private('App.Models.User.' + userId)
    .notification((notification) => {
        console.log(notification.type);
    });
使用 React、Vue 或 Svelte
Laravel Echo 包含 React、Vue 和 Svelte 鉤子,使監聽通知變得毫不費力。首先,呼叫 useEchoNotification 鉤子,該鉤子用於監聽通知。當消費元件被卸載時,useEchoNotification 鉤子將自動離開頻道:
import { useEchoNotification } from "@laravel/echo-react";

useEchoNotification(
    `App.Models.User.${userId}`,
    (notification) => {
        console.log(notification.type);
    },
);
預設情況下,鉤子監聽所有通知。要指定您希望監聽的通知類型,您可以向 useEchoNotification 提供一個字串或類型陣列:
import { useEchoNotification } from "@laravel/echo-react";

useEchoNotification(
    `App.Models.User.${userId}`,
    (notification) => {
        console.log(notification.type);
    },
    'App.Notifications.InvoicePaid',
);
您還可以指定通知負載資料的形狀,以獲得更好的類型安全性和編輯便利性:
type InvoicePaidNotification = {
    invoice_id: number;
    created_at: string;
};

useEchoNotification(
    `App.Models.User.${userId}`,
    (notification) => {
        console.log(notification.invoice_id);
        console.log(notification.created_at);
        console.log(notification.type);
    },
    'App.Notifications.InvoicePaid',
);
自訂通知通道
如果您希望自訂實體的廣播通知在哪個通道上廣播,可以在可通知實體上定義一個 receivesBroadcastNotificationsOn 方法:
<?php

namespace App\Models;

use Illuminate\Broadcasting\PrivateChannel;
use Illuminate\Foundation\Auth\User as Authenticatable;
use Illuminate\Notifications\Notifiable;

class User extends Authenticatable
{
    use Notifiable;

    /**
     * 使用者接收通知廣播的頻道。
     */
    public function receivesBroadcastNotificationsOn(): string
    {
        return 'users.'.$this->id;
    }
}
簡訊通知
先決條件
Laravel 中的簡訊通知由 Vonage(前身為 Nexmo)提供支援。在透過 Vonage 發送通知之前,您需要安裝 laravel/vonage-notification-channel 和 guzzlehttp/guzzle 套件:
composer require laravel/vonage-notification-channel guzzlehttp/guzzle
該套件包含一個配置檔案。但是,您不需要將此配置檔案匯出到您自己的應用程式。您可以簡單地使用 VONAGE_KEY 和 VONAGE_SECRET 環境變數來定義您的 Vonage 公共和密鑰金鑰。
定義好金鑰後,您應該設定一個 VONAGE_SMS_FROM 環境變數,用於定義簡訊訊息應從哪個電話號碼發送。您可以在 Vonage 控制面板中生成此電話號碼:
VONAGE_SMS_FROM=15556666666
格式化簡訊通知
如果通知支援作為簡訊發送,您應該在通知類別上定義一個 toVonage 方法。此方法將接收一個 $notifiable 實體,並應返回一個 Illuminate\Notifications\Messages\VonageMessage 實例:
use Illuminate\Notifications\Messages\VonageMessage;

/**
 * 獲取通知的 Vonage / 簡訊表示。
 */
public function toVonage(object $notifiable): VonageMessage
{
    return (new VonageMessage)
        ->content('Your SMS message content');
}
Unicode 內容
如果您的簡訊訊息將包含 Unicode 字元,您應該在建立 VonageMessage 實例時呼叫 unicode 方法:
use Illuminate\Notifications\Messages\VonageMessage;

/**
 * 獲取通知的 Vonage / 簡訊表示。
 */
public function toVonage(object $notifiable): VonageMessage
{
    return (new VonageMessage)
        ->content('Your unicode message')
        ->unicode();
}
自訂「寄件者」號碼
如果您希望從與您的 VONAGE_SMS_FROM 環境變數指定的電話號碼不同的電話號碼發送某些通知,可以在 VonageMessage 實例上呼叫 from 方法:
use Illuminate\Notifications\Messages\VonageMessage;

/**
 * 獲取通知的 Vonage / 簡訊表示。
 */
public function toVonage(object $notifiable): VonageMessage
{
    return (new VonageMessage)
        ->content('Your SMS message content')
        ->from('15554443333');
}
添加客戶參考
如果您希望追蹤每個使用者、團隊或客戶的成本,您可以向通知添加「客戶參考」。Vonage 將允許您使用此客戶參考生成報告,以便更好地了解特定客戶的簡訊使用情況。客戶參考可以是最多 40 個字元的任何字串:
use Illuminate\Notifications\Messages\VonageMessage;

/**
 * 獲取通知的 Vonage / 簡訊表示。
 */
public function toVonage(object $notifiable): VonageMessage
{
    return (new VonageMessage)
        ->clientReference((string) $notifiable->id)
        ->content('Your SMS message content');
}
路由簡訊通知
要將 Vonage 通知路由到正確的電話號碼,請在可通知實體上定義一個 routeNotificationForVonage 方法:
<?php

namespace App\Models;

use Illuminate\Foundation\Auth\User as Authenticatable;
use Illuminate\Notifications\Notifiable;
use Illuminate\Notifications\Notification;

class User extends Authenticatable
{
    use Notifiable;

    /**
     * 為 Vonage 通道路由通知。
     */
    public function routeNotificationForVonage(Notification $notification): string
    {
        return $this->phone_number;
    }
}
Slack 通知
先決條件
發送 Slack 通知之前,您應該透過 Composer 安裝 Slack 通知通道:
composer require laravel/slack-notification-channel
此外,您必須為您的 Slack 工作區建立一個 Slack App。
如果您只需要向建立 App 的同一個 Slack 工作區發送通知,您應該確保您的 App 具有 chat:write、chat:write.public 和 chat:write.customize 範圍。這些範圍可以從 Slack 中的「OAuth & Permissions」App 管理標籤頁添加。
接下來,複製 App 的「Bot User OAuth Token」並將其放在應用程式 services.php 配置檔案中的 slack 配置陣列中。此令牌可以在 Slack 中的「OAuth & Permissions」標籤頁上找到:
'slack' => [
    'notifications' => [
        'bot_user_oauth_token' => env('SLACK_BOT_USER_OAUTH_TOKEN'),
        'channel' => env('SLACK_BOT_USER_DEFAULT_CHANNEL'),
    ],
],
App 分發
如果您的應用程式將向應用程式使用者擁有的外部 Slack 工作區發送通知,則需要透過 Slack「分發」您的 App。App 分發可以從 Slack 中的 App「Manage Distribution」標籤頁管理。App 分發後,您可以使用 Socialite 來代表應用程式的使用者獲取 Slack Bot 令牌。
格式化 Slack 通知
如果通知支援作為 Slack 訊息發送,您應該在通知類別上定義一個 toSlack 方法。此方法將接收一個 $notifiable 實體,並應返回一個 Illuminate\Notifications\Slack\SlackMessage 實例。您可以使用 Slack 的 Block Kit API 建立富通知。以下範例可以在 Slack 的 Block Kit 建構器中預覽:
use Illuminate\Notifications\Slack\BlockKit\Blocks\ContextBlock;
use Illuminate\Notifications\Slack\BlockKit\Blocks\SectionBlock;
use Illuminate\Notifications\Slack\SlackMessage;

/**
 * 獲取通知的 Slack 表示。
 */
public function toSlack(object $notifiable): SlackMessage
{
    return (new SlackMessage)
        ->text('One of your invoices has been paid!')
        ->headerBlock('Invoice Paid')
        ->contextBlock(function (ContextBlock $block) {
            $block->text('Customer #1234');
        })
        ->sectionBlock(function (SectionBlock $block) {
            $block->text('An invoice has been paid.');
            $block->field("*Invoice No:*\n1000")->markdown();
            $block->field("*Invoice Recipient:*\ntaylor@laravel.com")->markdown();
        })
        ->dividerBlock()
        ->sectionBlock(function (SectionBlock $block) {
            $block->text('Congratulations!');
        });
}
使用 Slack 的 Block Kit Builder 範本
與其使用流暢的訊息建構器方法來建立 Block Kit 訊息,您可以將 Slack 的 Block Kit Builder 生成的原始 JSON 負載提供給 usingBlockKitTemplate 方法:
use Illuminate\Notifications\Slack\SlackMessage;
use Illuminate\Support\Str;

/**
 * 獲取通知的 Slack 表示。
 */
public function toSlack(object $notifiable): SlackMessage
{
    $template = <<<JSON
        {
          "blocks": [
            {
              "type": "header",
              "text": {
                "type": "plain_text",
                "text": "Team Announcement"
              }
            },
            {
              "type": "section",
              "text": {
                "type": "plain_text",
                "text": "We are hiring!"
              }
            }
          ]
        }
    JSON;

    return (new SlackMessage)
        ->usingBlockKitTemplate($template);
}
Slack 互動性
Slack 的 Block Kit 通知系統提供了強大的功能來處理使用者互動。要利用這些功能,您的 Slack App 應啟用「Interactivity」並配置一個指向由您的應用程式提供的 URL 的「Request URL」。這些設定可以從 Slack 中的「Interactivity & Shortcuts」App 管理標籤頁管理。
在以下使用 actionsBlock 方法的範例中,Slack 將向您的「Request URL」發送一個 POST 請求,其中包含點選按鈕的 Slack 使用者、點選的按鈕 ID 等負載。您的應用程式然後可以根據負載判斷要採取的操作。您還應該驗證請求是由 Slack 發出的:
use Illuminate\Notifications\Slack\BlockKit\Blocks\ActionsBlock;
use Illuminate\Notifications\Slack\BlockKit\Blocks\ContextBlock;
use Illuminate\Notifications\Slack\BlockKit\Blocks\SectionBlock;
use Illuminate\Notifications\Slack\SlackMessage;

/**
 * 獲取通知的 Slack 表示。
 */
public function toSlack(object $notifiable): SlackMessage
{
    return (new SlackMessage)
        ->text('One of your invoices has been paid!')
        ->headerBlock('Invoice Paid')
        ->contextBlock(function (ContextBlock $block) {
            $block->text('Customer #1234');
        })
        ->sectionBlock(function (SectionBlock $block) {
            $block->text('An invoice has been paid.');
        })
        ->actionsBlock(function (ActionsBlock $block) {
             // ID 預設為 "button_acknowledge_invoice"...
            $block->button('Acknowledge Invoice')->primary();

            // 手動配置 ID...
            $block->button('Deny')->danger()->id('deny_invoice');
        });
}
確認對話框
如果您希望在執行操作之前要求使用者確認該操作,可以在定義按鈕時呼叫 confirm 方法。confirm 方法接受一個訊息和一個接收 ConfirmObject 實例的閉包:
use Illuminate\Notifications\Slack\BlockKit\Blocks\ActionsBlock;
use Illuminate\Notifications\Slack\BlockKit\Blocks\ContextBlock;
use Illuminate\Notifications\Slack\BlockKit\Blocks\SectionBlock;
use Illuminate\Notifications\Slack\BlockKit\Composites\ConfirmObject;
use Illuminate\Notifications\Slack\SlackMessage;

/**
 * 獲取通知的 Slack 表示。
 */
public function toSlack(object $notifiable): SlackMessage
{
    return (new SlackMessage)
        ->text('One of your invoices has been paid!')
        ->headerBlock('Invoice Paid')
        ->contextBlock(function (ContextBlock $block) {
            $block->text('Customer #1234');
        })
        ->sectionBlock(function (SectionBlock $block) {
            $block->text('An invoice has been paid.');
        })
        ->actionsBlock(function (ActionsBlock $block) {
            $block->button('Acknowledge Invoice')
                ->primary()
                ->confirm(
                    'Acknowledge the payment and send a thank you email?',
                    function (ConfirmObject $dialog) {
                        $dialog->confirm('Yes');
                        $dialog->deny('No');
                    }
                );
        });
}
檢查 Slack 區塊
如果您希望快速檢查您一直在建立的區塊,可以在 SlackMessage 實例上呼叫 dd 方法。dd 方法將生成並傾印一個指向 Slack 的 Block Kit Builder 的 URL,該 URL 在瀏覽器中顯示負載和通知的預覽。您可以向 dd 方法傳遞 true 來傾印原始負載:
return (new SlackMessage)
    ->text('One of your invoices has been paid!')
    ->headerBlock('Invoice Paid')
    ->dd();
路由 Slack 通知
要將 Slack 通知定向到適當的 Slack 團隊和頻道,請在可通知模型上定義一個 routeNotificationForSlack 方法。此方法可以返回以下三個值之一:
null - 這會將路由延遲到通知本身配置的通道。您可以在建立 SlackMessage 時使用 to 方法來配置通知中的通道。- 一個指定要發送通知到的 Slack 頻道的字串,例如
#support-channel。
- 一個
SlackRoute 實例,允許您指定 OAuth 令牌和頻道名稱,例如 SlackRoute::make($this->slack_channel, $this->slack_token)。此方法應用於向外部工作區發送通知。
例如,從 routeNotificationForSlack 方法返回 #support-channel 將把通知發送到與應用程式 services.php 配置檔案中位於的 Bot User OAuth 令牌關聯的工作區中的 #support-channel 頻道:
<?php

namespace App\Models;

use Illuminate\Foundation\Auth\User as Authenticatable;
use Illuminate\Notifications\Notifiable;
use Illuminate\Notifications\Notification;

class User extends Authenticatable
{
    use Notifiable;

    /**
     * 為 Slack 通道路由通知。
     */
    public function routeNotificationForSlack(Notification $notification): mixed
    {
        return '#support-channel';
    }
}
通知外部 Slack 工作區
[!NOTE]
在向外部 Slack 工作區發送通知之前,您的 Slack App 必須已分發。
當然,您通常會希望向應用程式使用者擁有的 Slack 工作區發送通知。為此,您首先需要為使用者獲取一個 Slack OAuth 令牌。幸運的是,Laravel Socialite 包含一個 Slack 驅動程式,該驅動程式將允許您輕鬆地使用 Slack 認證應用程式的使用者並獲取 Bot 令牌。
獲取 Bot 令牌並將其儲存在應用程式的資料庫中後,您可以使用 SlackRoute::make 方法將通知路由到使用者的工作區。此外,您的應用程式可能還需要為使用者提供指定應向哪個頻道發送通知的機會:
<?php

namespace App\Models;

use Illuminate\Foundation\Auth\User as Authenticatable;
use Illuminate\Notifications\Notifiable;
use Illuminate\Notifications\Notification;
use Illuminate\Notifications\Slack\SlackRoute;

class User extends Authenticatable
{
    use Notifiable;

    /**
     * 為 Slack 通道路由通知。
     */
    public function routeNotificationForSlack(Notification $notification): mixed
    {
        return SlackRoute::make($this->slack_channel, $this->slack_token);
    }
}
本地化通知
Laravel 允許您以不同於 HTTP 請求當前語言環境的語言環境發送通知,並且即使通知被放入佇列也會記住此語言環境。
為此,Illuminate\Notifications\Notification 類別提供了一個 locale 方法來設定所需的語言。當評估通知時,應用程式將切換到此語言環境,然後在評估完成後恢復到先前的語言環境:
$user->notify((new InvoicePaid($invoice))->locale('es'));
也可以透過 Notification 外觀實現多個可通知實體的本地化:
Notification::locale('es')->send(
    $users, new InvoicePaid($invoice)
);
使用者首選語言環境
有時,應用程式會儲存每個使用者的首選語言環境。透過在可通知模型上實現 HasLocalePreference 合約,您可以指示 Laravel 在發送通知時使用此儲存的語言環境:
use Illuminate\Contracts\Translation\HasLocalePreference;

class User extends Model implements HasLocalePreference
{
    /**
     * 獲取使用者的首選語言環境。
     */
    public function preferredLocale(): string
    {
        return $this->locale;
    }
}
實現介面後,Laravel 將在向模型發送通知和可郵寄物件時自動使用首選語言環境。因此,使用此介面時無需呼叫 locale 方法:
$user->notify(new InvoicePaid($invoice));
測試
您可以使用 Notification 外觀的 fake 方法來阻止通知被發送。通常,發送通知與您實際測試的代碼無關。大多數情況下,只需斷言 Laravel 被指示發送給定的通知就足夠了。
呼叫 Notification 外觀的 fake 方法後,您可以斷言已指示將通知發送給使用者,甚至可以檢查通知收到的資料:
<?php

use App\Notifications\OrderShipped;
use Illuminate\Support\Facades\Notification;

test('orders can be shipped', function () {
    Notification::fake();

    // 執行訂單發貨...

    // 斷言沒有發送通知...
    Notification::assertNothingSent();

    // 斷言通知已發送給給定的使用者...
    Notification::assertSentTo(
        [$user], OrderShipped::class
    );

    // 斷言通知未發送...
    Notification::assertNotSentTo(
        [$user], AnotherNotification::class
    );

    // 斷言通知已發送兩次...
    Notification::assertSentTimes(WeeklyReminder::class, 2);

    // 斷言已發送給定數量的通知...
    Notification::assertCount(3);
});
<?php

namespace Tests\Feature;

use App\Notifications\OrderShipped;
use Illuminate\Support\Facades\Notification;
use Tests\TestCase;

class ExampleTest extends TestCase
{
    public function test_orders_can_be_shipped(): void
    {
        Notification::fake();

        // 執行訂單發貨...

        // 斷言沒有發送通知...
        Notification::assertNothingSent();

        // 斷言通知已發送給給定的使用者...
        Notification::assertSentTo(
            [$user], OrderShipped::class
        );

        // 斷言通知未發送...
        Notification::assertNotSentTo(
            [$user], AnotherNotification::class
        );

        // 斷言通知已發送兩次...
        Notification::assertSentTimes(WeeklyReminder::class, 2);

        // 斷言已發送給定數量的通知...
        Notification::assertCount(3);
    }
}
您可以向 assertSentTo 或 assertNotSentTo 方法傳遞一個閉包,以斷言發送了一個通過給定「真理測試」的通知。如果至少發送了一個通過給定真理測試的通知,則斷言將成功:
Notification::assertSentTo(
    $user,
    function (OrderShipped $notification, array $channels) use ($order) {
        return $notification->order->id === $order->id;
    }
);
按需通知
如果您正在測試的代碼發送按需通知,您可以透過 assertSentOnDemand 方法來測試按需通知是否已發送:
Notification::assertSentOnDemand(OrderShipped::class);
透過將閉包作為第二個參數傳遞給 assertSentOnDemand 方法,您可以判斷按需通知是否已發送到正確的「路由」地址:
Notification::assertSentOnDemand(
    OrderShipped::class,
    function (OrderShipped $notification, array $channels, object $notifiable) use ($user) {
        return $notifiable->routes['mail'] === $user->email;
    }
);
通知事件
通知發送事件
當通知正在發送時,Illuminate\Notifications\Events\NotificationSending 事件由通知系統派發。這包含「可通知」實體和通知實例本身。您可以在應用程式中為此事件建立事件監聽器:
use Illuminate\Notifications\Events\NotificationSending;

class CheckNotificationStatus
{
    /**
     * 處理事件。
     */
    public function handle(NotificationSending $event): void
    {
        // ...
    }
}
如果 NotificationSending 事件的事件監聽器從其 handle 方法返回 false,則不會發送通知:
/**
 * 處理事件。
 */
public function handle(NotificationSending $event): bool
{
    return false;
}
在事件監聽器中,您可以存取事件上的 notifiable、notification 和 channel 屬性,以了解更多有關通知收件者或通知本身的資訊:
/**
 * 處理事件。
 */
public function handle(NotificationSending $event): void
{
    // $event->channel
    // $event->notifiable
    // $event->notification
}
通知已發送事件
當通知被發送時,Illuminate\Notifications\Events\NotificationSent事件由通知系統派發。這包含「可通知」實體和通知實例本身。您可以在應用程式中為此事件建立事件監聽器:
use Illuminate\Notifications\Events\NotificationSent;

class LogNotification
{
    /**
     * 處理事件。
     */
    public function handle(NotificationSent $event): void
    {
        // ...
    }
}
在事件監聽器中,您可以存取事件上的 notifiable、notification、channel 和 response 屬性,以了解更多有關通知收件者或通知本身的資訊:
/**
 * 處理事件。
 */
public function handle(NotificationSent $event): void
{
    // $event->channel
    // $event->notifiable
    // $event->notification
    // $event->response
}
自訂通道
Laravel 附帶少數幾個通知通道,但您可能希望編寫自己的驅動程式來透過其他通道傳遞通知。Laravel 使這變得簡單。首先,定義一個包含 send 方法的類別。該方法應接收兩個參數:$notifiable 和 $notification。
在 send 方法中,您可以呼叫通知上的方法來檢索您的通道理解的訊息物件,然後以您希望的方式將通知發送給 $notifiable 實例:
<?php

namespace App\Notifications;

use Illuminate\Notifications\Notification;

class VoiceChannel
{
    /**
     * 發送給定的通知。
     */
    public function send(object $notifiable, Notification $notification): void
    {
        $message = $notification->toVoice($notifiable);

        // 將通知發送給 $notifiable 實例...
    }
}
定義好通知通道類別後,您可以從任何通知的 via 方法返回類別名稱。在此範例中,通知的 toVoice 方法可以返回您選擇用於表示語音訊息的任何物件。例如,您可以定義自己的 VoiceMessage 類別來表示這些訊息:
<?php

namespace App\Notifications;

use App\Notifications\Messages\VoiceMessage;
use App\Notifications\VoiceChannel;
use Illuminate\Bus\Queueable;
use Illuminate\Contracts\Queue\ShouldQueue;
use Illuminate\Notifications\Notification;

class InvoicePaid extends Notification
{
    use Queueable;

    /**
     * 獲取通知通道。
     */
    public function via(object $notifiable): string
    {
        return VoiceChannel::class;
    }

    /**
     * 獲取通知的語音表示。
     */
    public function toVoice(object $notifiable): VoiceMessage
    {
        // ...
    }
}
0 |
| Col 3 is | Right-Aligned | $20 |
自訂元件
您可以匯出所有 Markdown 通知元件到您自己的應用程式以進行自訂。要匯出元件,請使用 vendor:publish Artisan 命令來發佈 laravel-mail 資產標籤:
php artisan vendor:publish --tag=laravel-mail
此命令將 Markdown 郵件元件發佈到 resources/views/vendor/mail 目錄。mail 目錄將包含一個 html 和一個 text 目錄,每個目錄都包含每個可用元件的各自表示。您可以根據需要自由地自訂這些元件。
自訂 CSS
匯出元件後,resources/views/vendor/mail/html/themes 目錄將包含一個 default.css 檔案。您可以自訂此檔案中的 CSS,您的樣式將自動內聯到 Markdown 通知的 HTML 表示中。
如果您希望為 Laravel 的 Markdown 元件建立一個全新的主題,可以將 CSS 檔案放在 html/themes 目錄中。命名並儲存 CSS 檔案後,更新 mail 配置檔案的 theme 選項以匹配您新主題的名稱。
要自訂個別通知的主題,可以在建立通知的郵件訊息時呼叫 theme 方法。theme 方法接受發送通知時應使用的主題名稱:
/**
* 獲取通知的郵件表示。
*/
public function toMail(object $notifiable): MailMessage
{
return (new MailMessage)
->theme('invoice')
->subject('Invoice Paid')
->markdown('mail.invoice.paid', ['url' => $url]);
}
資料庫通知
先決條件
database 通知通道將通知資訊儲存在資料庫表中。此表將包含有關通知類型的資訊以及描述通知的 JSON 資料結構。
您可以查詢該表以在應用程式的使用者介面中顯示通知。但是,在執行此操作之前,您需要建立一個資料庫表來保存您的通知。您可以使用 make:notifications-table 命令來生成具有適當表架構的遷移:
php artisan make:notifications-table
php artisan migrate
[!NOTE] 如果您的可通知模型正在使用 UUID 或 ULID 主鍵,您應該在通知表遷移中將
morphs方法替換為 uuidMorphs 或 ulidMorphs。
格式化資料庫通知
如果通知支援儲存在資料庫表中,您應該在通知類別上定義一個 toDatabase 或 toArray 方法。此方法將接收一個 $notifiable 實體,並應返回一個純 PHP 陣列。返回的陣列將被編碼為 JSON 並儲存在 notifications 表的 data 欄位中。讓我們看看一個範例 toArray 方法:
/**
* 獲取通知的陣列表示。
*
* @return array
*/
public function toArray(object $notifiable): array
{
return [
'invoice_id' => $this->invoice->id,
'amount' => $this->invoice->amount,
];
}
當通知儲存在應用程式的資料庫中時,type 欄位預設將被設定為通知的類別名稱,而 read_at 欄位將為 null。但是,您可以透過在通知類別中定義 databaseType 和 initialDatabaseReadAtValue 方法來自訂此行為:
use Illuminate\Support\Carbon;
/**
* 獲取通知的資料庫類型。
*/
public function databaseType(object $notifiable): string
{
return 'invoice-paid';
}
/**
* 獲取「read_at」欄位的初始值。
*/
public function initialDatabaseReadAtValue(): ?Carbon
{
return null;
}
toDatabase vs. toArray
toArray 方法也被 broadcast 通道用於判斷應向您的 JavaScript 前端廣播哪些資料。如果您希望為 database 和 broadcast 通道有不同的陣列表示,您應該定義一個 toDatabase 方法而不是 toArray 方法。
存取通知
通知儲存在資料庫中後,您需要一種便利的方式從可通知實體中存取它們。Illuminate\Notifications\Notifiable trait 包含在 Laravel 的預設 App\Models\User 模型中,它包含一個 notifications Eloquent 關聯,該關聯返回實體的通知。要獲取通知,您可以像任何其他 Eloquent 關聯一樣存取此方法。預設情況下,通知將按 created_at 時間戳排序,最新的通知位於集合的開頭:
$user = App\Models\User::find(1);
foreach ($user->notifications as $notification) {
echo $notification->type;
}
如果您只想檢索「未讀」通知,可以使用 unreadNotifications 關聯。同樣,這些通知將按 created_at 時間戳排序,最新的通知位於集合的開頭:
$user = App\Models\User::find(1);
foreach ($user->unreadNotifications as $notification) {
echo $notification->type;
}
如果您只想檢索「已讀」通知,可以使用 readNotifications 關聯:
$user = App\Models\User::find(1);
foreach ($user->readNotifications as $notification) {
echo $notification->type;
}
[!NOTE] 要從您的 JavaScript 客戶端存取通知,您應該為應用程式定義一個通知控制器,該控制器返回可通知實體(如當前使用者)的通知。然後,您可以從 JavaScript 客戶端向該控制器的 URL 發出 HTTP 請求。
將通知標記為已讀
通常,您會希望在使用者查看通知時將其標記為「已讀」。Illuminate\Notifications\Notifiable trait 提供了一個 markAsRead 方法,它會更新通知資料庫記錄上的 read_at 欄位:
$user = App\Models\User::find(1);
foreach ($user->unreadNotifications as $notification) {
$notification->markAsRead();
}
但是,與其循環遍歷每個通知,您可以直接在通知集合上使用 markAsRead 方法:
$user->unreadNotifications->markAsRead();
您還可以使用批量更新查詢來將所有通知標記為已讀,而無需從資料庫中檢索它們:
$user = App\Models\User::find(1);
$user->unreadNotifications()->update(['read_at' => now()]);
您可以 delete 通知以完全從表中移除它們:
$user->notifications()->delete();
廣播通知
先決條件
廣播通知之前,您應該配置並熟悉 Laravel 的事件廣播服務。事件廣播提供了一種從您的 JavaScript 前端回應伺服器端 Laravel 事件的方式。
格式化廣播通知
broadcast 通道使用 Laravel 的事件廣播服務廣播通知,允許您的 JavaScript 前端即時捕獲通知。如果通知支援廣播,您可以在通知類別上定義一個 toBroadcast 方法。此方法將接收一個 $notifiable 實體,並應返回一個 BroadcastMessage 實例。如果 toBroadcast 方法不存在,則 toArray 方法將用於收集應廣播的資料。返回的資料將被編碼為 JSON 並廣播到您的 JavaScript 前端。讓我們看看一個範例 toBroadcast 方法:
use Illuminate\Notifications\Messages\BroadcastMessage;
/**
* 獲取通知的可廣播表示。
*/
public function toBroadcast(object $notifiable): BroadcastMessage
{
return new BroadcastMessage([
'invoice_id' => $this->invoice->id,
'amount' => $this->invoice->amount,
]);
}
廣播佇列配置
所有廣播通知都被放入佇列以進行廣播。如果您希望配置用於佇列廣播操作的佇列連接或佇列名稱,可以使用 BroadcastMessage 的 onConnection 和 onQueue 方法:
return (new BroadcastMessage($data))
->onConnection('sqs')
->onQueue('broadcasts');
自訂通知類型
除了您指定的資料外,所有廣播通知還有一個包含通知完整類別名稱的 type 欄位。如果您希望自訂通知 type,可以在通知類別上定義一個 broadcastType 方法:
/**
* 獲取正在廣播的通知的類型。
*/
public function broadcastType(): string
{
return 'broadcast.message';
}
監聽通知
通知將在使用 {notifiable}.{id} 約定格式化的私有頻道上廣播。因此,如果您正在向 ID 為 1 的 App\Models\User 實例發送通知,則通知將在 App.Models.User.1 私有頻道上廣播。使用 Laravel Echo 時,您可以使用 notification 方法輕鬆地在頻道上監聽通知:
Echo.private('App.Models.User.' + userId)
.notification((notification) => {
console.log(notification.type);
});
使用 React、Vue 或 Svelte
Laravel Echo 包含 React、Vue 和 Svelte 鉤子,使監聽通知變得毫不費力。首先,呼叫 useEchoNotification 鉤子,該鉤子用於監聽通知。當消費元件被卸載時,useEchoNotification 鉤子將自動離開頻道:
import { useEchoNotification } from "@laravel/echo-react";
useEchoNotification(
`App.Models.User.${userId}`,
(notification) => {
console.log(notification.type);
},
);
預設情況下,鉤子監聽所有通知。要指定您希望監聽的通知類型,您可以向 useEchoNotification 提供一個字串或類型陣列:
import { useEchoNotification } from "@laravel/echo-react";
useEchoNotification(
`App.Models.User.${userId}`,
(notification) => {
console.log(notification.type);
},
'App.Notifications.InvoicePaid',
);
您還可以指定通知負載資料的形狀,以獲得更好的類型安全性和編輯便利性:
type InvoicePaidNotification = {
invoice_id: number;
created_at: string;
};
useEchoNotification(
`App.Models.User.${userId}`,
(notification) => {
console.log(notification.invoice_id);
console.log(notification.created_at);
console.log(notification.type);
},
'App.Notifications.InvoicePaid',
);
自訂通知通道
如果您希望自訂實體的廣播通知在哪個通道上廣播,可以在可通知實體上定義一個 receivesBroadcastNotificationsOn 方法:
<?php
namespace App\Models;
use Illuminate\Broadcasting\PrivateChannel;
use Illuminate\Foundation\Auth\User as Authenticatable;
use Illuminate\Notifications\Notifiable;
class User extends Authenticatable
{
use Notifiable;
/**
* 使用者接收通知廣播的頻道。
*/
public function receivesBroadcastNotificationsOn(): string
{
return 'users.'.$this->id;
}
}
簡訊通知
先決條件
Laravel 中的簡訊通知由 Vonage(前身為 Nexmo)提供支援。在透過 Vonage 發送通知之前,您需要安裝 laravel/vonage-notification-channel 和 guzzlehttp/guzzle 套件:
composer require laravel/vonage-notification-channel guzzlehttp/guzzle
該套件包含一個配置檔案。但是,您不需要將此配置檔案匯出到您自己的應用程式。您可以簡單地使用 VONAGE_KEY 和 VONAGE_SECRET 環境變數來定義您的 Vonage 公共和密鑰金鑰。
定義好金鑰後,您應該設定一個 VONAGE_SMS_FROM 環境變數,用於定義簡訊訊息應從哪個電話號碼發送。您可以在 Vonage 控制面板中生成此電話號碼:
VONAGE_SMS_FROM=15556666666
格式化簡訊通知
如果通知支援作為簡訊發送,您應該在通知類別上定義一個 toVonage 方法。此方法將接收一個 $notifiable 實體,並應返回一個 Illuminate\Notifications\Messages\VonageMessage 實例:
use Illuminate\Notifications\Messages\VonageMessage;
/**
* 獲取通知的 Vonage / 簡訊表示。
*/
public function toVonage(object $notifiable): VonageMessage
{
return (new VonageMessage)
->content('Your SMS message content');
}
Unicode 內容
如果您的簡訊訊息將包含 Unicode 字元,您應該在建立 VonageMessage 實例時呼叫 unicode 方法:
use Illuminate\Notifications\Messages\VonageMessage;
/**
* 獲取通知的 Vonage / 簡訊表示。
*/
public function toVonage(object $notifiable): VonageMessage
{
return (new VonageMessage)
->content('Your unicode message')
->unicode();
}
自訂「寄件者」號碼
如果您希望從與您的 VONAGE_SMS_FROM 環境變數指定的電話號碼不同的電話號碼發送某些通知,可以在 VonageMessage 實例上呼叫 from 方法:
use Illuminate\Notifications\Messages\VonageMessage;
/**
* 獲取通知的 Vonage / 簡訊表示。
*/
public function toVonage(object $notifiable): VonageMessage
{
return (new VonageMessage)
->content('Your SMS message content')
->from('15554443333');
}
添加客戶參考
如果您希望追蹤每個使用者、團隊或客戶的成本,您可以向通知添加「客戶參考」。Vonage 將允許您使用此客戶參考生成報告,以便更好地了解特定客戶的簡訊使用情況。客戶參考可以是最多 40 個字元的任何字串:
use Illuminate\Notifications\Messages\VonageMessage;
/**
* 獲取通知的 Vonage / 簡訊表示。
*/
public function toVonage(object $notifiable): VonageMessage
{
return (new VonageMessage)
->clientReference((string) $notifiable->id)
->content('Your SMS message content');
}
路由簡訊通知
要將 Vonage 通知路由到正確的電話號碼,請在可通知實體上定義一個 routeNotificationForVonage 方法:
<?php
namespace App\Models;
use Illuminate\Foundation\Auth\User as Authenticatable;
use Illuminate\Notifications\Notifiable;
use Illuminate\Notifications\Notification;
class User extends Authenticatable
{
use Notifiable;
/**
* 為 Vonage 通道路由通知。
*/
public function routeNotificationForVonage(Notification $notification): string
{
return $this->phone_number;
}
}
Slack 通知
先決條件
發送 Slack 通知之前,您應該透過 Composer 安裝 Slack 通知通道:
composer require laravel/slack-notification-channel
此外,您必須為您的 Slack 工作區建立一個 Slack App。
如果您只需要向建立 App 的同一個 Slack 工作區發送通知,您應該確保您的 App 具有 chat:write、chat:write.public 和 chat:write.customize 範圍。這些範圍可以從 Slack 中的「OAuth & Permissions」App 管理標籤頁添加。
接下來,複製 App 的「Bot User OAuth Token」並將其放在應用程式 services.php 配置檔案中的 slack 配置陣列中。此令牌可以在 Slack 中的「OAuth & Permissions」標籤頁上找到:
'slack' => [
'notifications' => [
'bot_user_oauth_token' => env('SLACK_BOT_USER_OAUTH_TOKEN'),
'channel' => env('SLACK_BOT_USER_DEFAULT_CHANNEL'),
],
],
App 分發
如果您的應用程式將向應用程式使用者擁有的外部 Slack 工作區發送通知,則需要透過 Slack「分發」您的 App。App 分發可以從 Slack 中的 App「Manage Distribution」標籤頁管理。App 分發後,您可以使用 Socialite 來代表應用程式的使用者獲取 Slack Bot 令牌。
格式化 Slack 通知
如果通知支援作為 Slack 訊息發送,您應該在通知類別上定義一個 toSlack 方法。此方法將接收一個 $notifiable 實體,並應返回一個 Illuminate\Notifications\Slack\SlackMessage 實例。您可以使用 Slack 的 Block Kit API 建立富通知。以下範例可以在 Slack 的 Block Kit 建構器中預覽:
use Illuminate\Notifications\Slack\BlockKit\Blocks\ContextBlock;
use Illuminate\Notifications\Slack\BlockKit\Blocks\SectionBlock;
use Illuminate\Notifications\Slack\SlackMessage;
/**
* 獲取通知的 Slack 表示。
*/
public function toSlack(object $notifiable): SlackMessage
{
return (new SlackMessage)
->text('One of your invoices has been paid!')
->headerBlock('Invoice Paid')
->contextBlock(function (ContextBlock $block) {
$block->text('Customer #1234');
})
->sectionBlock(function (SectionBlock $block) {
$block->text('An invoice has been paid.');
$block->field("*Invoice No:*\n1000")->markdown();
$block->field("*Invoice Recipient:*\ntaylor@laravel.com")->markdown();
})
->dividerBlock()
->sectionBlock(function (SectionBlock $block) {
$block->text('Congratulations!');
});
}
使用 Slack 的 Block Kit Builder 範本
與其使用流暢的訊息建構器方法來建立 Block Kit 訊息,您可以將 Slack 的 Block Kit Builder 生成的原始 JSON 負載提供給 usingBlockKitTemplate 方法:
use Illuminate\Notifications\Slack\SlackMessage;
use Illuminate\Support\Str;
/**
* 獲取通知的 Slack 表示。
*/
public function toSlack(object $notifiable): SlackMessage
{
$template = <<<JSON
{
"blocks": [
{
"type": "header",
"text": {
"type": "plain_text",
"text": "Team Announcement"
}
},
{
"type": "section",
"text": {
"type": "plain_text",
"text": "We are hiring!"
}
}
]
}
JSON;
return (new SlackMessage)
->usingBlockKitTemplate($template);
}
Slack 互動性
Slack 的 Block Kit 通知系統提供了強大的功能來處理使用者互動。要利用這些功能,您的 Slack App 應啟用「Interactivity」並配置一個指向由您的應用程式提供的 URL 的「Request URL」。這些設定可以從 Slack 中的「Interactivity & Shortcuts」App 管理標籤頁管理。
在以下使用 actionsBlock 方法的範例中,Slack 將向您的「Request URL」發送一個 POST 請求,其中包含點選按鈕的 Slack 使用者、點選的按鈕 ID 等負載。您的應用程式然後可以根據負載判斷要採取的操作。您還應該驗證請求是由 Slack 發出的:
use Illuminate\Notifications\Slack\BlockKit\Blocks\ActionsBlock;
use Illuminate\Notifications\Slack\BlockKit\Blocks\ContextBlock;
use Illuminate\Notifications\Slack\BlockKit\Blocks\SectionBlock;
use Illuminate\Notifications\Slack\SlackMessage;
/**
* 獲取通知的 Slack 表示。
*/
public function toSlack(object $notifiable): SlackMessage
{
return (new SlackMessage)
->text('One of your invoices has been paid!')
->headerBlock('Invoice Paid')
->contextBlock(function (ContextBlock $block) {
$block->text('Customer #1234');
})
->sectionBlock(function (SectionBlock $block) {
$block->text('An invoice has been paid.');
})
->actionsBlock(function (ActionsBlock $block) {
// ID 預設為 "button_acknowledge_invoice"...
$block->button('Acknowledge Invoice')->primary();
// 手動配置 ID...
$block->button('Deny')->danger()->id('deny_invoice');
});
}
確認對話框
如果您希望在執行操作之前要求使用者確認該操作,可以在定義按鈕時呼叫 confirm 方法。confirm 方法接受一個訊息和一個接收 ConfirmObject 實例的閉包:
use Illuminate\Notifications\Slack\BlockKit\Blocks\ActionsBlock;
use Illuminate\Notifications\Slack\BlockKit\Blocks\ContextBlock;
use Illuminate\Notifications\Slack\BlockKit\Blocks\SectionBlock;
use Illuminate\Notifications\Slack\BlockKit\Composites\ConfirmObject;
use Illuminate\Notifications\Slack\SlackMessage;
/**
* 獲取通知的 Slack 表示。
*/
public function toSlack(object $notifiable): SlackMessage
{
return (new SlackMessage)
->text('One of your invoices has been paid!')
->headerBlock('Invoice Paid')
->contextBlock(function (ContextBlock $block) {
$block->text('Customer #1234');
})
->sectionBlock(function (SectionBlock $block) {
$block->text('An invoice has been paid.');
})
->actionsBlock(function (ActionsBlock $block) {
$block->button('Acknowledge Invoice')
->primary()
->confirm(
'Acknowledge the payment and send a thank you email?',
function (ConfirmObject $dialog) {
$dialog->confirm('Yes');
$dialog->deny('No');
}
);
});
}
檢查 Slack 區塊
如果您希望快速檢查您一直在建立的區塊,可以在 SlackMessage 實例上呼叫 dd 方法。dd 方法將生成並傾印一個指向 Slack 的 Block Kit Builder 的 URL,該 URL 在瀏覽器中顯示負載和通知的預覽。您可以向 dd 方法傳遞 true 來傾印原始負載:
return (new SlackMessage)
->text('One of your invoices has been paid!')
->headerBlock('Invoice Paid')
->dd();
路由 Slack 通知
要將 Slack 通知定向到適當的 Slack 團隊和頻道,請在可通知模型上定義一個 routeNotificationForSlack 方法。此方法可以返回以下三個值之一:
null- 這會將路由延遲到通知本身配置的通道。您可以在建立SlackMessage時使用to方法來配置通知中的通道。- 一個指定要發送通知到的 Slack 頻道的字串,例如
#support-channel。 - 一個
SlackRoute實例,允許您指定 OAuth 令牌和頻道名稱,例如SlackRoute::make($this->slack_channel, $this->slack_token)。此方法應用於向外部工作區發送通知。
例如,從 routeNotificationForSlack 方法返回 #support-channel 將把通知發送到與應用程式 services.php 配置檔案中位於的 Bot User OAuth 令牌關聯的工作區中的 #support-channel 頻道:
<?php
namespace App\Models;
use Illuminate\Foundation\Auth\User as Authenticatable;
use Illuminate\Notifications\Notifiable;
use Illuminate\Notifications\Notification;
class User extends Authenticatable
{
use Notifiable;
/**
* 為 Slack 通道路由通知。
*/
public function routeNotificationForSlack(Notification $notification): mixed
{
return '#support-channel';
}
}
通知外部 Slack 工作區
[!NOTE] 在向外部 Slack 工作區發送通知之前,您的 Slack App 必須已分發。
當然,您通常會希望向應用程式使用者擁有的 Slack 工作區發送通知。為此,您首先需要為使用者獲取一個 Slack OAuth 令牌。幸運的是,Laravel Socialite 包含一個 Slack 驅動程式,該驅動程式將允許您輕鬆地使用 Slack 認證應用程式的使用者並獲取 Bot 令牌。
獲取 Bot 令牌並將其儲存在應用程式的資料庫中後,您可以使用 SlackRoute::make 方法將通知路由到使用者的工作區。此外,您的應用程式可能還需要為使用者提供指定應向哪個頻道發送通知的機會:
<?php
namespace App\Models;
use Illuminate\Foundation\Auth\User as Authenticatable;
use Illuminate\Notifications\Notifiable;
use Illuminate\Notifications\Notification;
use Illuminate\Notifications\Slack\SlackRoute;
class User extends Authenticatable
{
use Notifiable;
/**
* 為 Slack 通道路由通知。
*/
public function routeNotificationForSlack(Notification $notification): mixed
{
return SlackRoute::make($this->slack_channel, $this->slack_token);
}
}
本地化通知
Laravel 允許您以不同於 HTTP 請求當前語言環境的語言環境發送通知,並且即使通知被放入佇列也會記住此語言環境。
為此,Illuminate\Notifications\Notification 類別提供了一個 locale 方法來設定所需的語言。當評估通知時,應用程式將切換到此語言環境,然後在評估完成後恢復到先前的語言環境:
$user->notify((new InvoicePaid($invoice))->locale('es'));
也可以透過 Notification 外觀實現多個可通知實體的本地化:
Notification::locale('es')->send(
$users, new InvoicePaid($invoice)
);
使用者首選語言環境
有時,應用程式會儲存每個使用者的首選語言環境。透過在可通知模型上實現 HasLocalePreference 合約,您可以指示 Laravel 在發送通知時使用此儲存的語言環境:
use Illuminate\Contracts\Translation\HasLocalePreference;
class User extends Model implements HasLocalePreference
{
/**
* 獲取使用者的首選語言環境。
*/
public function preferredLocale(): string
{
return $this->locale;
}
}
實現介面後,Laravel 將在向模型發送通知和可郵寄物件時自動使用首選語言環境。因此,使用此介面時無需呼叫 locale 方法:
$user->notify(new InvoicePaid($invoice));
測試
您可以使用 Notification 外觀的 fake 方法來阻止通知被發送。通常,發送通知與您實際測試的代碼無關。大多數情況下,只需斷言 Laravel 被指示發送給定的通知就足夠了。
呼叫 Notification 外觀的 fake 方法後,您可以斷言已指示將通知發送給使用者,甚至可以檢查通知收到的資料:
<?php
use App\Notifications\OrderShipped;
use Illuminate\Support\Facades\Notification;
test('orders can be shipped', function () {
Notification::fake();
// 執行訂單發貨...
// 斷言沒有發送通知...
Notification::assertNothingSent();
// 斷言通知已發送給給定的使用者...
Notification::assertSentTo(
[$user], OrderShipped::class
);
// 斷言通知未發送...
Notification::assertNotSentTo(
[$user], AnotherNotification::class
);
// 斷言通知已發送兩次...
Notification::assertSentTimes(WeeklyReminder::class, 2);
// 斷言已發送給定數量的通知...
Notification::assertCount(3);
});
<?php
namespace Tests\Feature;
use App\Notifications\OrderShipped;
use Illuminate\Support\Facades\Notification;
use Tests\TestCase;
class ExampleTest extends TestCase
{
public function test_orders_can_be_shipped(): void
{
Notification::fake();
// 執行訂單發貨...
// 斷言沒有發送通知...
Notification::assertNothingSent();
// 斷言通知已發送給給定的使用者...
Notification::assertSentTo(
[$user], OrderShipped::class
);
// 斷言通知未發送...
Notification::assertNotSentTo(
[$user], AnotherNotification::class
);
// 斷言通知已發送兩次...
Notification::assertSentTimes(WeeklyReminder::class, 2);
// 斷言已發送給定數量的通知...
Notification::assertCount(3);
}
}
您可以向 assertSentTo 或 assertNotSentTo 方法傳遞一個閉包,以斷言發送了一個通過給定「真理測試」的通知。如果至少發送了一個通過給定真理測試的通知,則斷言將成功:
Notification::assertSentTo(
$user,
function (OrderShipped $notification, array $channels) use ($order) {
return $notification->order->id === $order->id;
}
);
按需通知
如果您正在測試的代碼發送按需通知,您可以透過 assertSentOnDemand 方法來測試按需通知是否已發送:
Notification::assertSentOnDemand(OrderShipped::class);
透過將閉包作為第二個參數傳遞給 assertSentOnDemand 方法,您可以判斷按需通知是否已發送到正確的「路由」地址:
Notification::assertSentOnDemand(
OrderShipped::class,
function (OrderShipped $notification, array $channels, object $notifiable) use ($user) {
return $notifiable->routes['mail'] === $user->email;
}
);
通知事件
通知發送事件
當通知正在發送時,Illuminate\Notifications\Events\NotificationSending 事件由通知系統派發。這包含「可通知」實體和通知實例本身。您可以在應用程式中為此事件建立事件監聽器:
use Illuminate\Notifications\Events\NotificationSending;
class CheckNotificationStatus
{
/**
* 處理事件。
*/
public function handle(NotificationSending $event): void
{
// ...
}
}
如果 NotificationSending 事件的事件監聽器從其 handle 方法返回 false,則不會發送通知:
/**
* 處理事件。
*/
public function handle(NotificationSending $event): bool
{
return false;
}
在事件監聽器中,您可以存取事件上的 notifiable、notification 和 channel 屬性,以了解更多有關通知收件者或通知本身的資訊:
/**
* 處理事件。
*/
public function handle(NotificationSending $event): void
{
// $event->channel
// $event->notifiable
// $event->notification
}
通知已發送事件
當通知被發送時,Illuminate\Notifications\Events\NotificationSent事件由通知系統派發。這包含「可通知」實體和通知實例本身。您可以在應用程式中為此事件建立事件監聽器:
use Illuminate\Notifications\Events\NotificationSent;
class LogNotification
{
/**
* 處理事件。
*/
public function handle(NotificationSent $event): void
{
// ...
}
}
在事件監聽器中,您可以存取事件上的 notifiable、notification、channel 和 response 屬性,以了解更多有關通知收件者或通知本身的資訊:
/**
* 處理事件。
*/
public function handle(NotificationSent $event): void
{
// $event->channel
// $event->notifiable
// $event->notification
// $event->response
}
自訂通道
Laravel 附帶少數幾個通知通道,但您可能希望編寫自己的驅動程式來透過其他通道傳遞通知。Laravel 使這變得簡單。首先,定義一個包含 send 方法的類別。該方法應接收兩個參數:$notifiable 和 $notification。
在 send 方法中,您可以呼叫通知上的方法來檢索您的通道理解的訊息物件,然後以您希望的方式將通知發送給 $notifiable 實例:
<?php
namespace App\Notifications;
use Illuminate\Notifications\Notification;
class VoiceChannel
{
/**
* 發送給定的通知。
*/
public function send(object $notifiable, Notification $notification): void
{
$message = $notification->toVoice($notifiable);
// 將通知發送給 $notifiable 實例...
}
}
定義好通知通道類別後,您可以從任何通知的 via 方法返回類別名稱。在此範例中,通知的 toVoice 方法可以返回您選擇用於表示語音訊息的任何物件。例如,您可以定義自己的 VoiceMessage 類別來表示這些訊息:
<?php
namespace App\Notifications;
use App\Notifications\Messages\VoiceMessage;
use App\Notifications\VoiceChannel;
use Illuminate\Bus\Queueable;
use Illuminate\Contracts\Queue\ShouldQueue;
use Illuminate\Notifications\Notification;
class InvoicePaid extends Notification
{
use Queueable;
/**
* 獲取通知通道。
*/
public function via(object $notifiable): string
{
return VoiceChannel::class;
}
/**
* 獲取通知的語音表示。
*/
public function toVoice(object $notifiable): VoiceMessage
{
// ...
}
}